Common Instancetypes — 系統架構
本文深入剖析 kubevirt/common-instancetypes 的原始碼架構,涵蓋目錄結構、Kustomize 建置系統、版本管理及部署流程。
專案概述
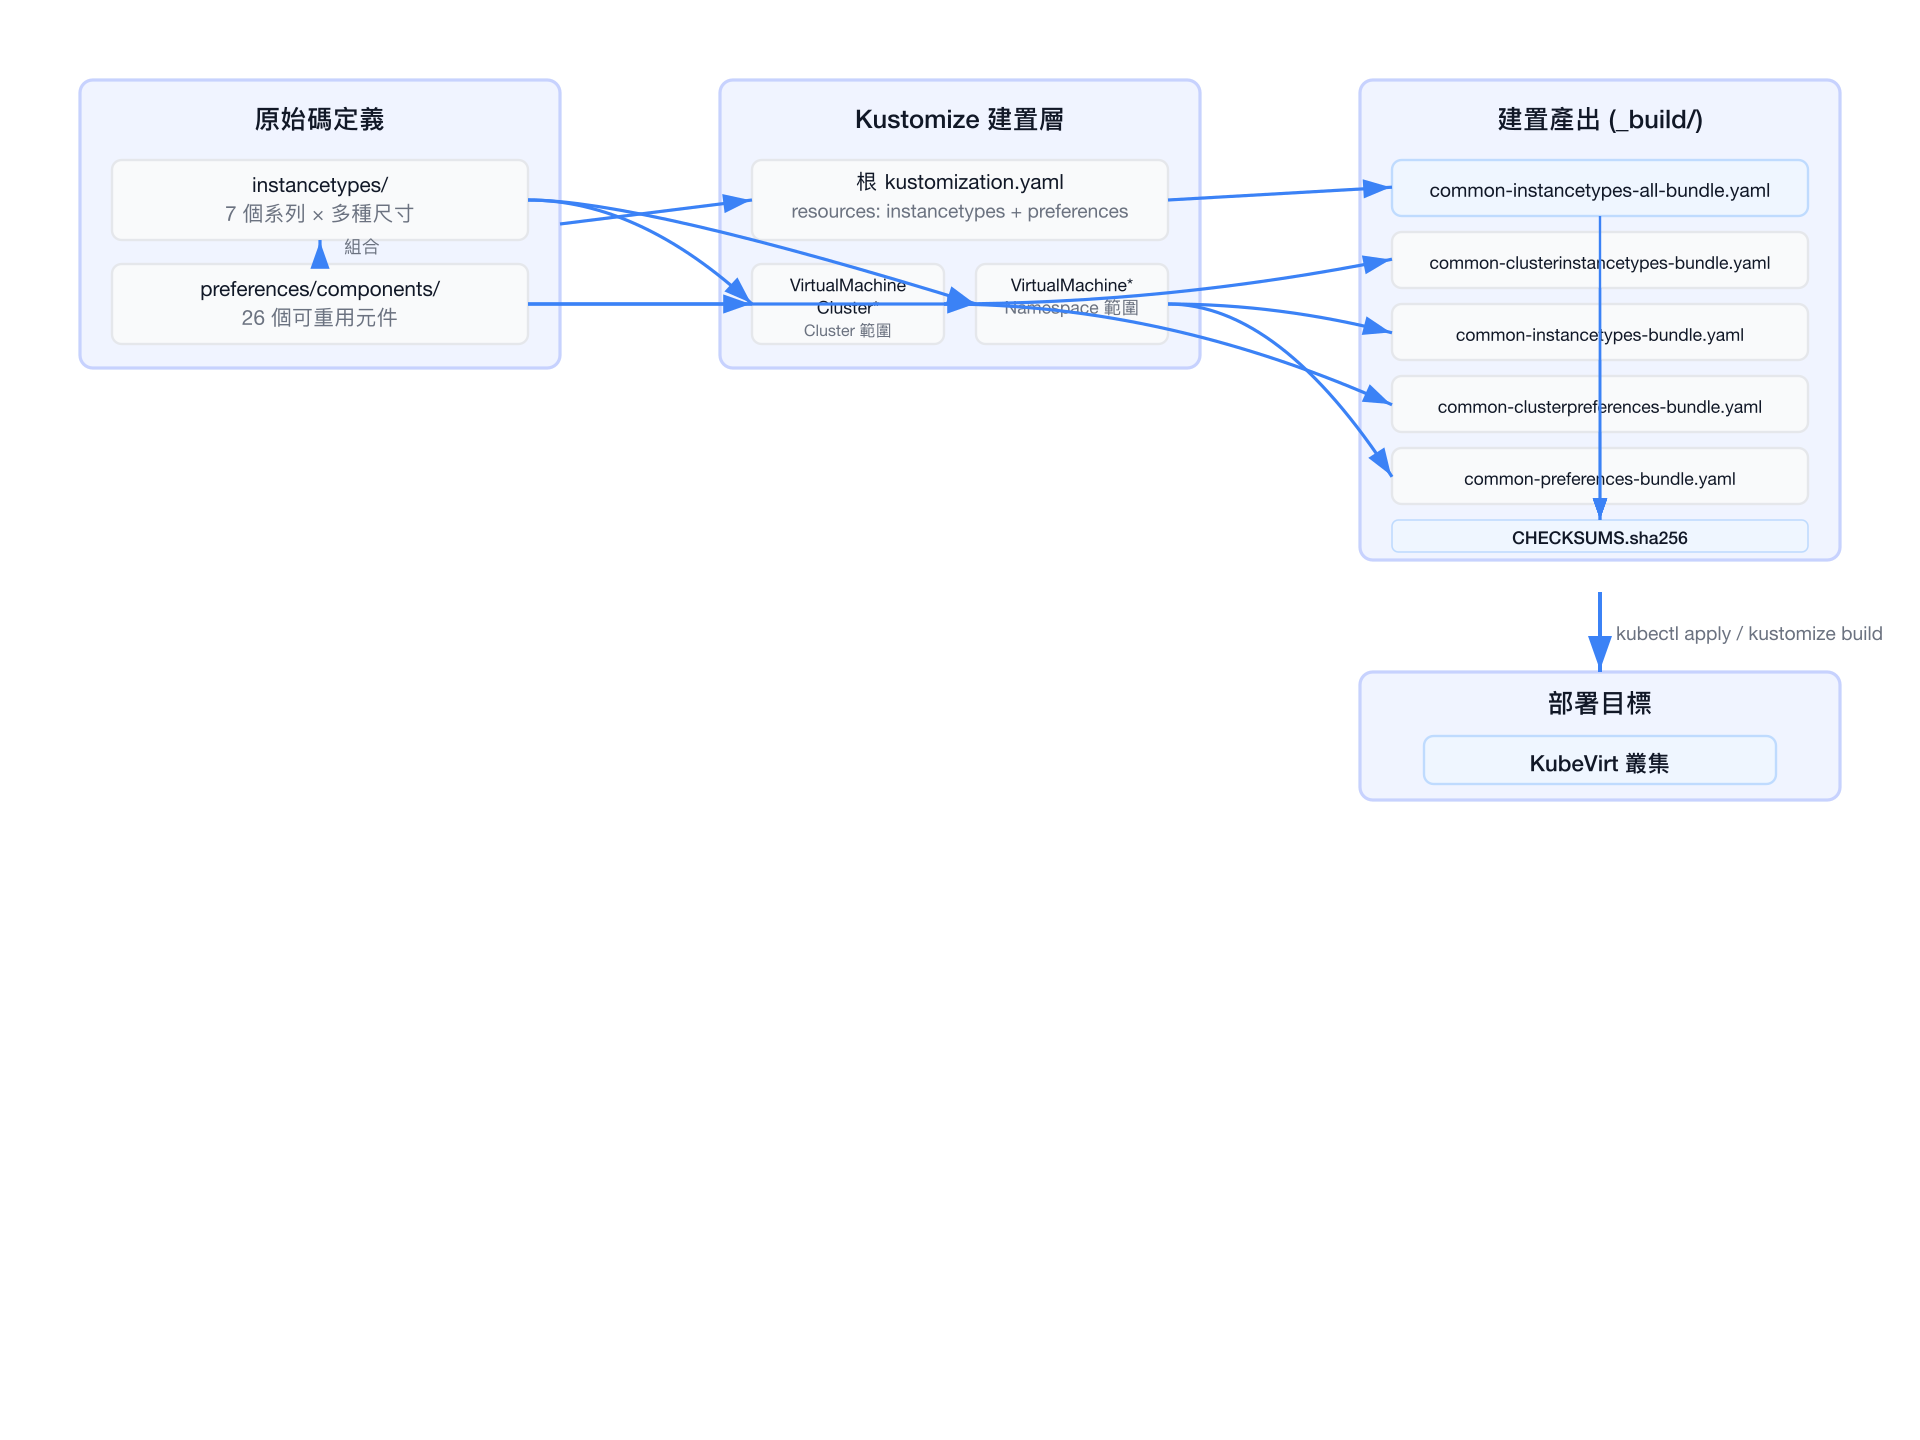
common-instancetypes 為 KubeVirt 提供一組標準化的 Instance Types(實例類型)與 Preferences(偏好設定),讓使用者能以類似雲端供應商的命名慣例(例如 u1.large、cx1.xlarge)快速建立虛擬機。
核心概念
- Instance Type:定義 VM 的 CPU 與記憶體配置(例如 vCPU 數量、是否使用 hugepages、NUMA 拓撲等)
- Preference:定義 OS 層級的偏好設定(例如磁碟匯流排類型、網路介面模型、EFI 韌體、Hyper-V 功能等)
- 兩者皆支援 Cluster 範圍(
VirtualMachineClusterInstancetype/VirtualMachineClusterPreference)與 Namespace 範圍(VirtualMachineInstancetype/VirtualMachinePreference)
系統架構圖
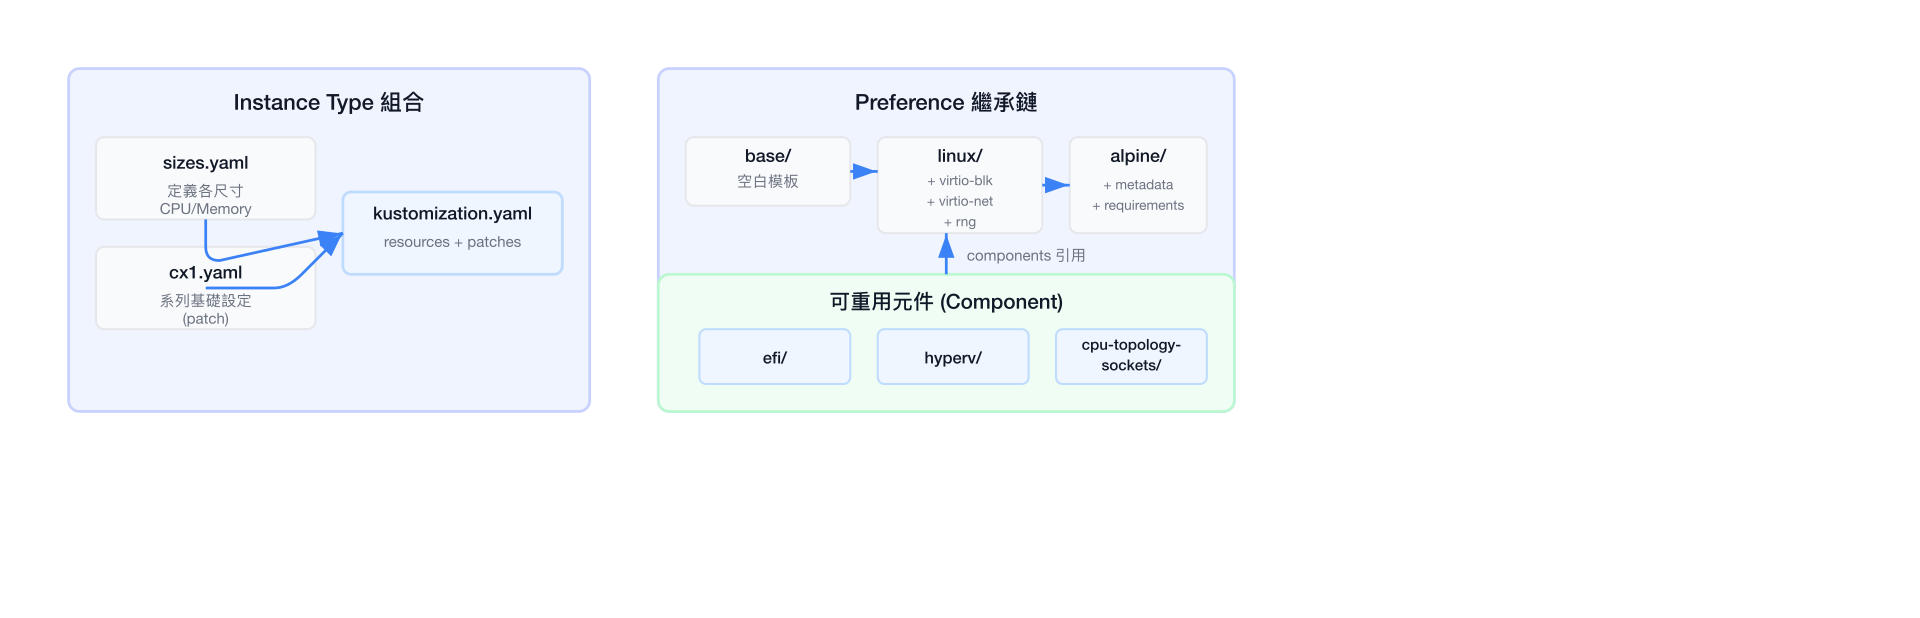
Kustomize 組合模式
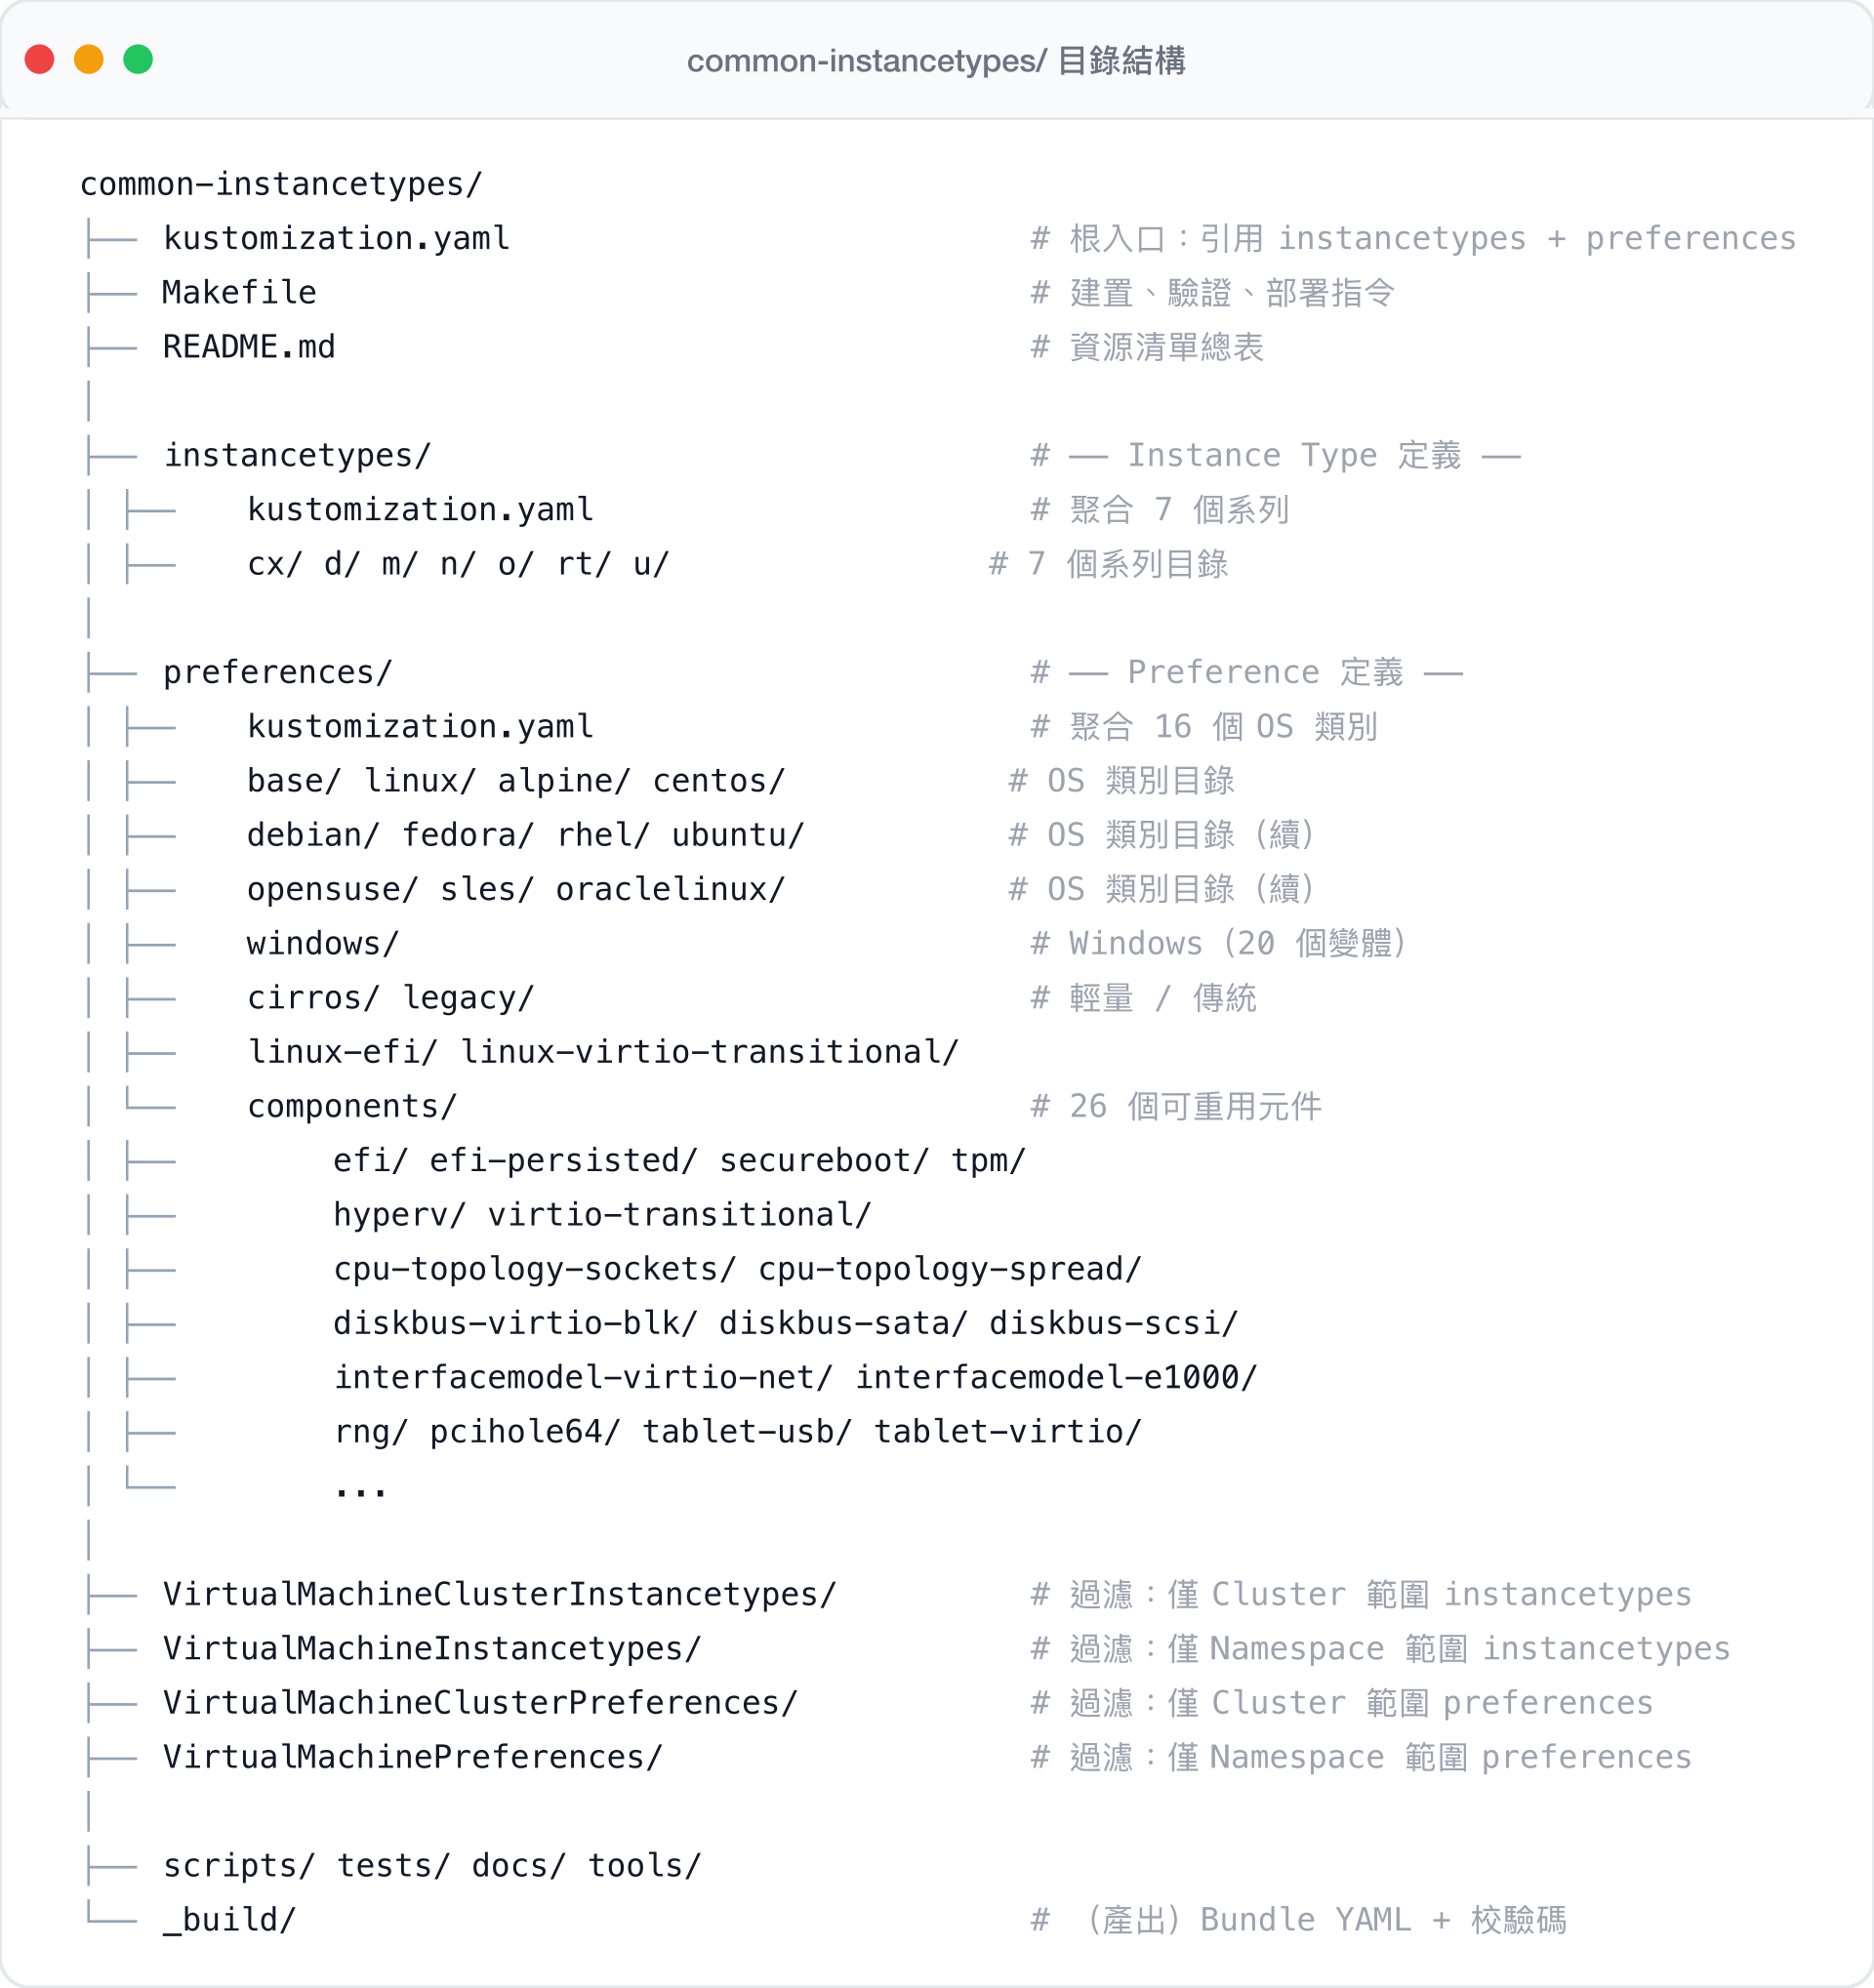
目錄結構
Instance Type 系列特性比較
| 特性 | U (通用) | O (超額) | CX (運算) | M (記憶體) | N (網路) | RT (即時) | D (專用) |
|---|---|---|---|---|---|---|---|
| vCPU:Memory 比例 | 1:4 | 1:4 | 1:2 | 1:8 | 1:2 | 1:4 | 1:4 |
| Hugepages | ✓ | ✓ | ✓ | ✓ | |||
| 超額記憶體 | ✓ | ||||||
| 專用 CPU | ✓ | ✓ | ✓ | ✓ | |||
| Burstable CPU | ✓ | ✓ | ✓ | ||||
| 隔離模擬器執行緒 | ✓ | ✓ | ✓ | ✓ | |||
| vNUMA | ✓ | ✓ |
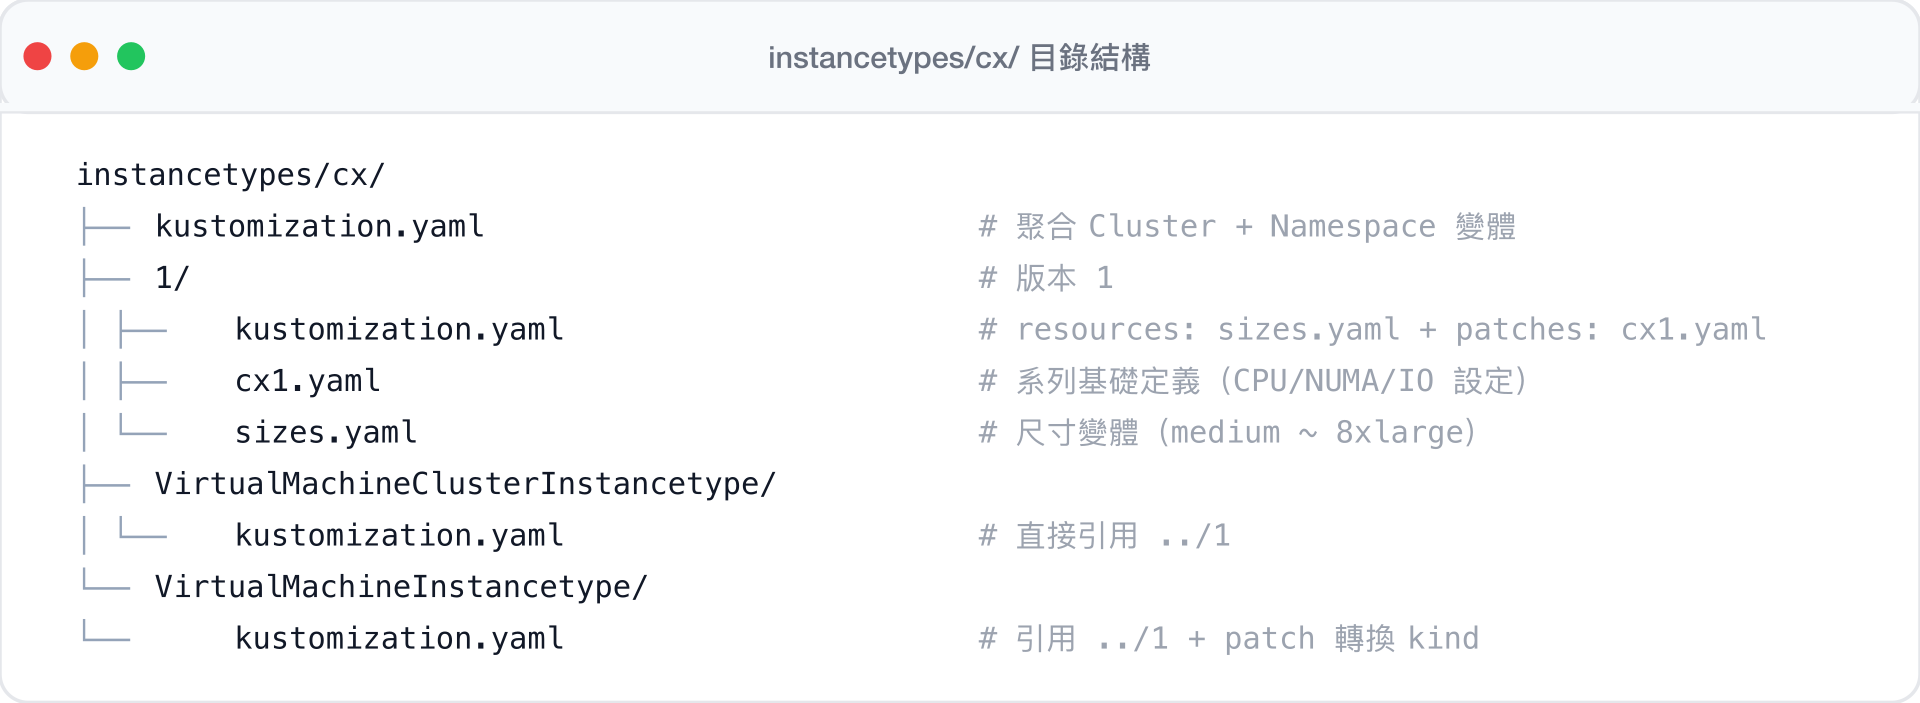
每個系列的目錄結構
以 cx/(Compute Exclusive)為例:
Kustomize 建置系統
根入口
# kustomization.yaml
apiVersion: kustomize.config.k8s.io/v1beta1
kind: Kustomization

resources:
  - ./instancetypes
- ./preferences這是整個專案的入口點,kustomize build . 會遞迴載入所有 instance types 與 preferences。
Instance Type 的組合方式
每個系列透過 基礎定義 + 尺寸變體 + Kustomize patches 來組合:
# instancetypes/cx/1/kustomization.yaml
apiVersion: kustomize.config.k8s.io/v1beta1
kind: Kustomization

resources:
  - ./sizes.yaml          # 定義 medium, large, xlarge, 2xlarge 等尺寸

patches:
  - path: cx1.yaml        # 將系列基礎設定套用到所有尺寸
    target:
      kind: VirtualMachineClusterInstancetype
sizes.yaml 定義各尺寸的 CPU 與記憶體:
# instancetypes/cx/1/sizes.yaml (節錄)
apiVersion: instancetype.kubevirt.io/v1beta1
kind: VirtualMachineClusterInstancetype
metadata:
  name: "cx1.2xlarge"
  labels:
    instancetype.kubevirt.io/cpu: "8"
    instancetype.kubevirt.io/memory: "16Gi"
    instancetype.kubevirt.io/size: "2xlarge"
    instancetype.kubevirt.io/hugepages: "2Mi"
spec:
  cpu:
    guest: 8
    maxSockets: 8
  memory:
    guest: "16Gi"
    hugepages:
      pageSize: "2Mi"
cx1.yaml 提供系列共用的進階設定(例如 dedicatedCPU、NUMA),以 patch 形式套用到所有尺寸:
# instancetypes/cx/1/cx1.yaml (節錄)
kind: VirtualMachineClusterInstancetype
metadata:
  name: "cx"
  annotations:
    instancetype.kubevirt.io/displayName: "Compute Exclusive"
  labels:
    instancetype.kubevirt.io/class: "compute.exclusive"
    instancetype.kubevirt.io/dedicatedCPUPlacement: "true"
    instancetype.kubevirt.io/isolateEmulatorThread: "true"
    instancetype.kubevirt.io/numa: "true"
spec:
  cpu:
    dedicatedCPUPlacement: true
    isolateEmulatorThread: true
    numa:
      guestMappingPassthrough: {}
  ioThreadsPolicy: "auto"
Cluster 與 Namespace 範圍的轉換
專案使用一套 YAML 原始碼同時產生兩種範圍的資源:
# instancetypes/cx/VirtualMachineClusterInstancetype/kustomization.yaml
# 直接引用,保持 Cluster 範圍
resources:
- "../1"# instancetypes/cx/VirtualMachineInstancetype/kustomization.yaml
# 引用相同原始碼,但透過 patch 將 kind 轉換為 Namespace 範圍
resources:
- "../1"
patches:
- target:
kind: VirtualMachineClusterInstancetype
patch: |-
- op: replace
path: /kind
value: VirtualMachineInstancetype選擇性部署
頂層的 VirtualMachineClusterInstancetypes/ 與 VirtualMachineInstancetypes/ 目錄則使用 $patch: delete 來過濾不需要的資源類型:
# VirtualMachineClusterInstancetypes/kustomization.yaml
# 刪除所有 Namespace 範圍資源,僅保留 Cluster 範圍
resources:
  - ../instancetypes
patches:
  - target:
      kind: VirtualMachineInstancetype
    patch: |-
      apiVersion: instancetype.kubevirt.io/v1beta1
      metadata:
        name: VirtualMachineInstancetype
      kind: VirtualMachineInstancetype
      $patch: delete
Preference 的繼承與組合
Preferences 使用 繼承鏈 + 可重用元件 的設計模式:
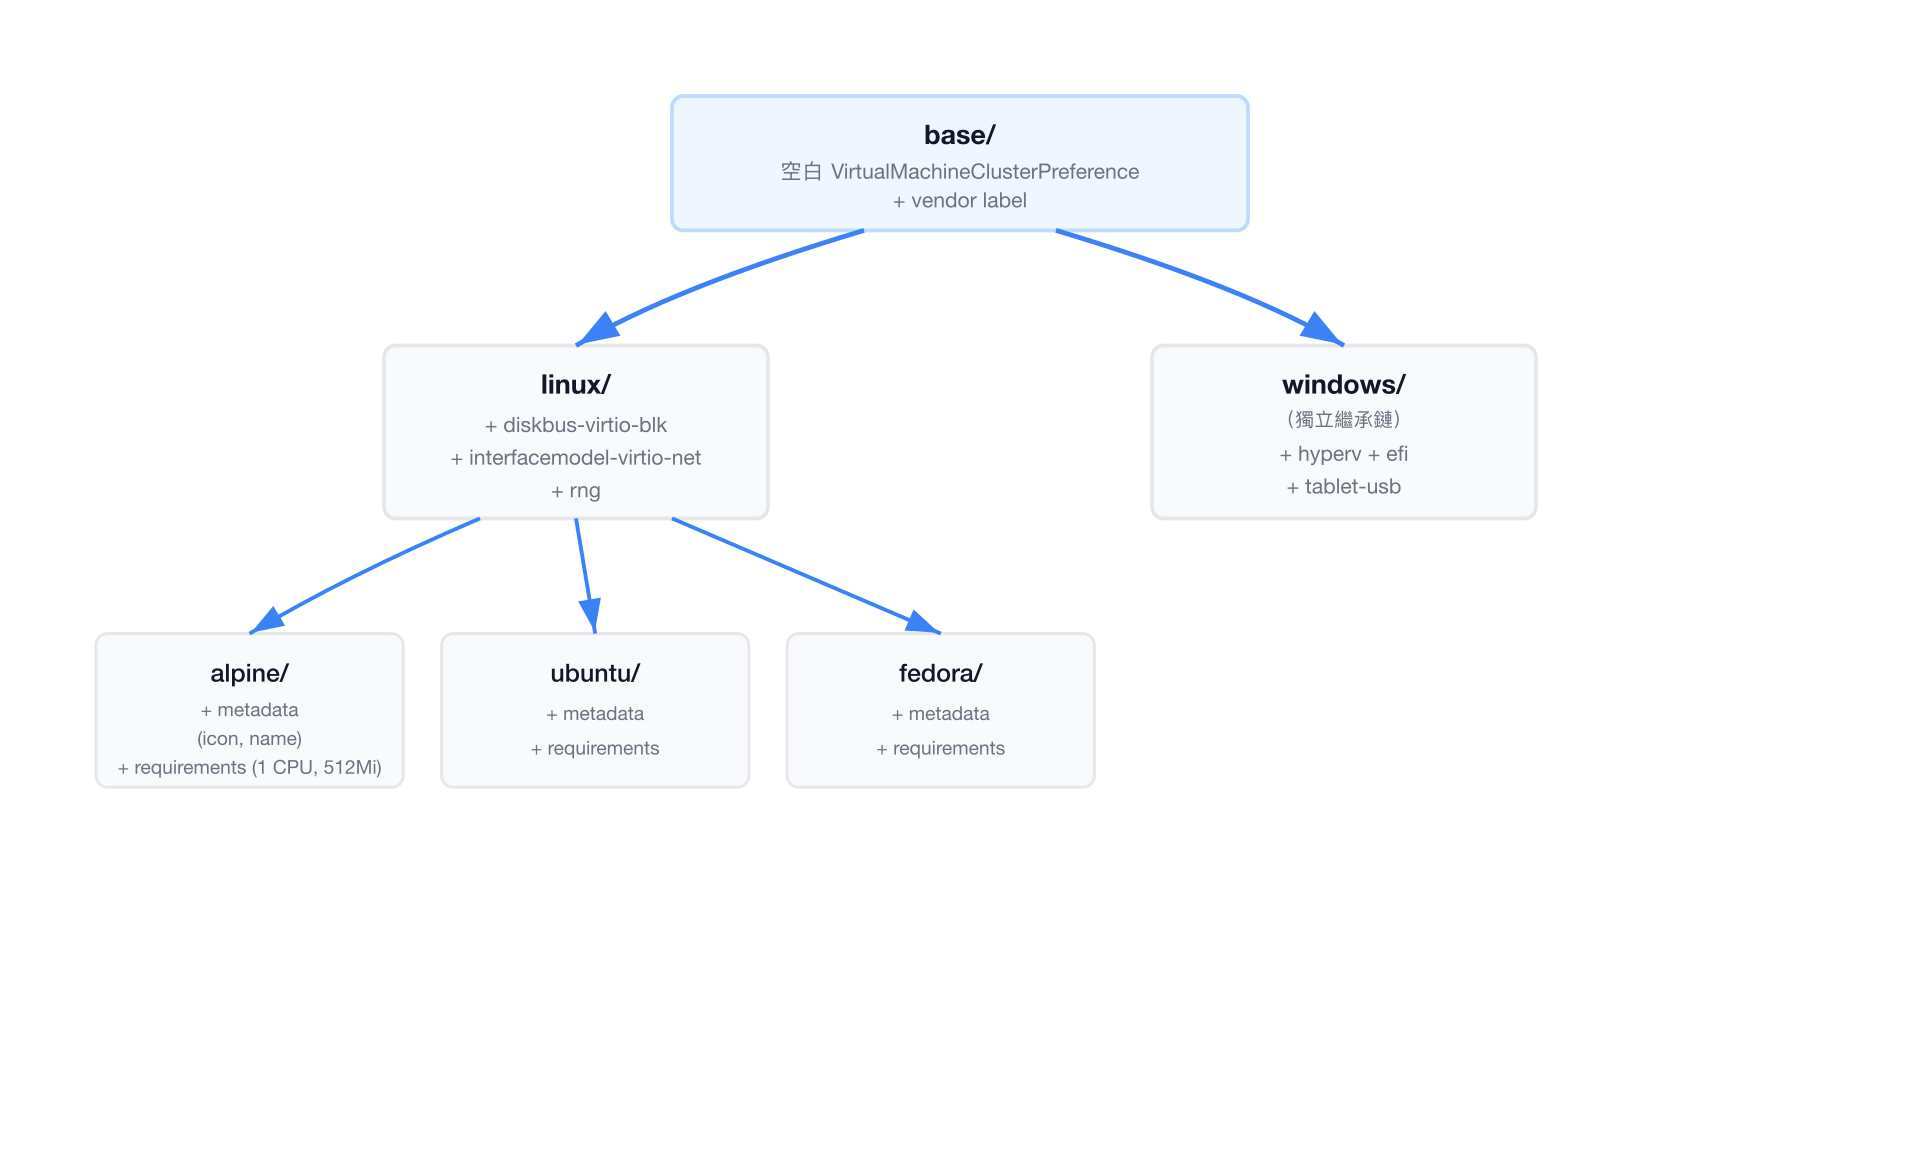
linux preference 的 kustomization 範例:
# preferences/linux/kustomization.yaml
apiVersion: kustomize.config.k8s.io/v1beta1
kind: Kustomization

resources:
  - ../base                                  # 繼承 base 模板

components:                                  # 組合可重用元件
  - ./metadata
  - ../components/diskbus-virtio-blk         # VirtIO 磁碟匯流排
  - ../components/interfacemodel-virtio-net  # VirtIO 網路介面
  - ../components/rng                        # 隨機數產生器

patches:
  - target:
      kind: VirtualMachinePreference
    patch: |-
      - op: replace
        path: /metadata/name
        value: linux
  - target:
      kind: VirtualMachineClusterPreference
    patch: |-
      - op: replace
        path: /metadata/name
        value: linux
alpine 則繼承 linux 並加上自身設定:
# preferences/alpine/kustomization.yaml
apiVersion: kustomize.config.k8s.io/v1beta1
kind: Kustomization

resources:
  - ../linux                                 # 繼承 linux(含 base + 元件)

components:
  - ./metadata                               # Alpine 的圖示與名稱
  - ./requirements                           # 最低需求 (1 CPU, 512Mi)

patches:
  - target:
      kind: VirtualMachinePreference
    patch: |-
      - op: replace
        path: /metadata/name
        value: alpine
  - target:
      kind: VirtualMachineClusterPreference
    patch: |-
      - op: replace
        path: /metadata/name
        value: alpine
可重用元件(Component)
preferences/components/ 下的 26 個元件使用 Kustomize Component 類型(v1alpha1),可被多個 OS preferences 引用:
# preferences/components/efi/kustomization.yaml
apiVersion: kustomize.config.k8s.io/v1alpha1
kind: Component

patches:
  - path: ./efi.yaml
    target:
      kind: VirtualMachinePreference
  - path: ./efi.yaml
    target:
      kind: VirtualMachineClusterPreference
每個元件都會同時 patch VirtualMachinePreference 與 VirtualMachineClusterPreference,確保兩種範圍的資源獲得一致的設定。
元件分類:
| 類別 | 元件 |
|---|---|
| CPU 拓撲 | cpu-topology-sockets, cpu-topology-spread, cpu-topology-spread-4 |
| 磁碟設定 | diskbus-virtio-blk, diskbus-sata, diskbus-scsi, disk-dedicatediothread |
| 韌體 / 安全 | efi, efi-persisted, secureboot, tpm |
| 網路介面 | interfacemodel-virtio-net, interfacemodel-e1000, interfacemodel-e1000e, interfacemodel-rtl8139, interface-multiqueue |
| Hypervisor 功能 | hyperv, virtio-transitional |
| 架構 | preferred-architecture, required-architecture |
| 裝置與其他 | rng, pcihole64, tablet-usb, tablet-virtio, termination-grace-period, deprecated |
建置流程
scripts/generate.sh
此腳本是核心建置流程,從 Kustomize 原始碼產生五個 bundle 檔案:
# scripts/generate.sh (完整邏輯)
#!/bin/bash
set -e

mkdir -p _build
cd _build || exit 1

# 1. 全部資源 (Cluster + Namespace instancetypes 和 preferences)
echo "---" > common-instancetypes-all-bundle.yaml
kustomize build .. >> common-instancetypes-all-bundle.yaml

# 2. 僅 Namespace 範圍 instancetypes
echo "---" > common-instancetypes-bundle.yaml
kustomize build ../VirtualMachineInstancetypes >> common-instancetypes-bundle.yaml

# 3. 僅 Cluster 範圍 instancetypes
echo "---" > common-clusterinstancetypes-bundle.yaml
kustomize build ../VirtualMachineClusterInstancetypes >> common-clusterinstancetypes-bundle.yaml

# 4. 僅 Namespace 範圍 preferences
echo "---" > common-preferences-bundle.yaml
kustomize build ../VirtualMachinePreferences >> common-preferences-bundle.yaml

# 5. 僅 Cluster 範圍 preferences
echo "---" > common-clusterpreferences-bundle.yaml
kustomize build ../VirtualMachineClusterPreferences >> common-clusterpreferences-bundle.yaml

# 加入版本標籤並計算校驗碼
COMMON_INSTANCETYPES_VERSION=${COMMON_INSTANCETYPES_VERSION-$(git describe --tags)}
export COMMON_INSTANCETYPES_VERSION
for bundle in common-*-bundle.yaml; do
    yq -i '... .metadata.labels.["instancetype.kubevirt.io/common-instancetypes-version"]
           =env(COMMON_INSTANCETYPES_VERSION)' "${bundle}"
    sha256sum "${bundle}" >> CHECKSUMS.sha256
done
產出的 _build/ 目錄內容:
| 檔案 | 內容 |
|---|---|
common-instancetypes-all-bundle.yaml | 所有資源(完整 bundle) |
common-clusterinstancetypes-bundle.yaml | 僅 VirtualMachineClusterInstancetype |
common-instancetypes-bundle.yaml | 僅 VirtualMachineInstancetype |
common-clusterpreferences-bundle.yaml | 僅 VirtualMachineClusterPreference |
common-preferences-bundle.yaml | 僅 VirtualMachinePreference |
CHECKSUMS.sha256 | 所有 bundle 的 SHA256 校驗碼 |
Makefile 建置目標
# 主要建置目標
make generate    # 執行 scripts/generate.sh,產出 _build/ bundles
make lint        # 執行 YAML 與 Shell 腳本 linting
make validate    # 對 bundle 進行 KubeVirt OpenAPI schema 驗證
make readme      # 根據 bundle 內容重新產生 README 資源表格
make test        # 執行 Go 單元測試
make deploy      # 部署 KubeVirt + CDI,再同步資源
make functest    # 對運行中的叢集執行功能測試
版本管理
版本來源優先順序
- 環境變數
COMMON_INSTANCETYPES_VERSION(最高優先) - Git tag 透過
git describe --tags - Fallback:
"noversion"
版本標籤注入
scripts/generate.sh 使用 yq 將版本寫入每個資源的 label:
# 產出的 bundle 中每個資源都會包含
metadata:
  labels:
    instancetype.kubevirt.io/common-instancetypes-version: "v1.3.0"
校驗碼驗證
每次建置都會產生 _build/CHECKSUMS.sha256,包含所有 bundle 的 SHA256 雜湊值,供發布時驗證檔案完整性。
發布流程
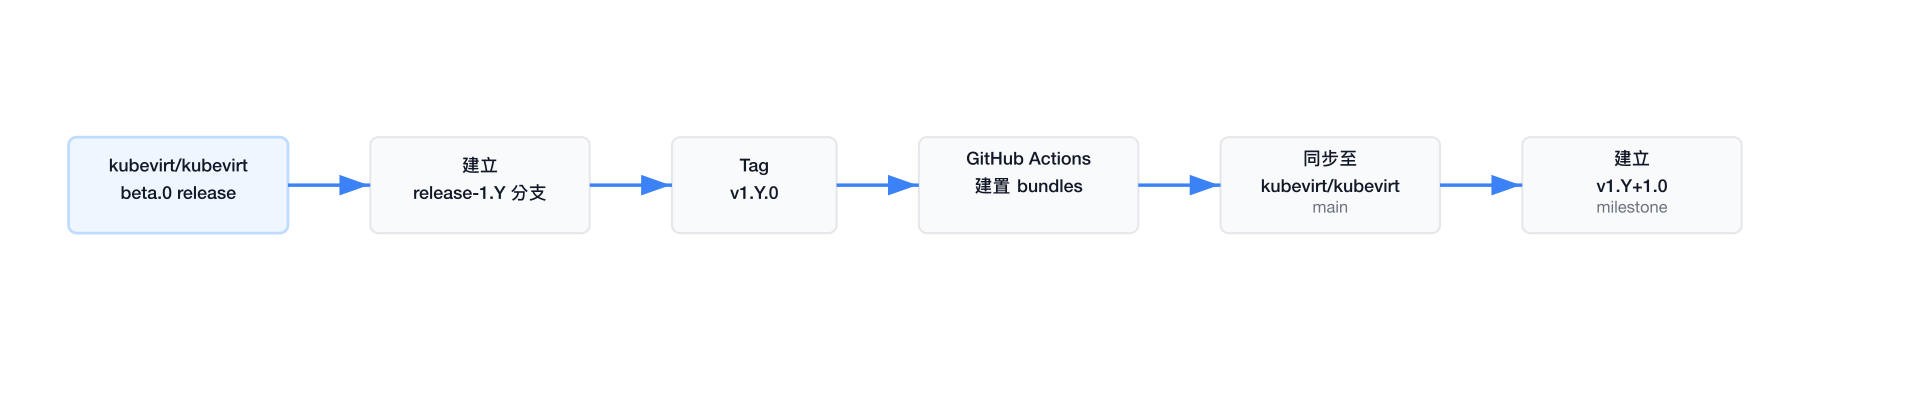
根據 docs/release.md,發布時程與 KubeVirt 的 beta.0 版本對齊:
- 從
main分支切出release-1.${Y}分支 - 在 release 分支上建立
v1.${Y}.0標籤 - GitHub Actions release workflow 自動建置並產生 bundle
- 將 pre-submit job 定義複製到 release 專用檔案
- 更新 periodic job 將最新 release 同步至
kubevirt/kubevirt主分支 - 建立下一個 release cycle 的
v1.{Y+1}.0milestone
部署方式
方法一:直接使用 Kustomize 建置
# 部署所有資源(Cluster + Namespace 範圍)
kustomize build . | kubectl apply -f -

# 僅部署 Cluster 範圍 instancetypes
kustomize build ./VirtualMachineClusterInstancetypes | kubectl apply -f -

# 僅部署 Cluster 範圍 preferences
kustomize build ./VirtualMachineClusterPreferences | kubectl apply -f -

# 僅部署 Namespace 範圍 instancetypes
kustomize build ./VirtualMachineInstancetypes | kubectl apply -f -

# 僅部署 Namespace 範圍 preferences
kustomize build ./VirtualMachinePreferences | kubectl apply -f -
方法二:使用 sync.sh 自動同步
scripts/sync.sh 使用 label-based 策略確保乾淨更新:
# scripts/sync.sh 核心邏輯
# 1. 先刪除現有的 kubevirt.io vendor 資源(避免殘留舊版本)
${KUBECTL} delete VirtualMachineClusterInstancetypes \
  -l instancetype.kubevirt.io/vendor=kubevirt.io
${KUBECTL} delete VirtualMachineClusterPreferences \
  -l instancetype.kubevirt.io/vendor=kubevirt.io

# 2. 部署新版本
${KUBECTL} apply -k "${BASEDIR}"/VirtualMachineClusterInstancetypes
${KUBECTL} apply -k "${BASEDIR}"/VirtualMachineClusterPreferences
為什麼需要先刪再建?
當 instance type 或 preference 被移除或重新命名時,單純的 kubectl apply 無法清除舊資源。透過 instancetype.kubevirt.io/vendor=kubevirt.io label 選取並刪除,可確保叢集上不會殘留已棄用的定義。
方法三:部署 KubeVirt + CDI 基礎設施
scripts/deploy-kubevirt-and-cdi.sh 可一鍵部署完整的測試環境:
# 自動取得最新穩定版 KubeVirt
KUBEVIRT_VERSION=$(curl -L \
  https://storage.googleapis.com/kubevirt-prow/devel/release/kubevirt/kubevirt/stable.txt)
kubectl apply -f ".../kubevirt-operator.yaml"
kubectl apply -f ".../kubevirt-cr.yaml"
kubectl wait --for=condition=Available --timeout=600s kv/kubevirt

# 自動取得最新 CDI 版本
CDI_VERSION=$(curl -s https://api.github.com/repos/kubevirt/containerized-data-importer/releases/latest)
kubectl apply -f ".../cdi-operator.yaml"
kubectl apply -f ".../cdi-cr.yaml"
kubectl wait --for=condition=Available --timeout=600s cdi/cdi
方法四:使用預建 Bundle
從 GitHub Releases 下載已建置的 bundle:
# 下載並驗證
VERSION="v1.3.0"
curl -LO "https://github.com/kubevirt/common-instancetypes/releases/download/${VERSION}/common-instancetypes-all-bundle.yaml"
curl -LO "https://github.com/kubevirt/common-instancetypes/releases/download/${VERSION}/CHECKSUMS.sha256"
sha256sum -c CHECKSUMS.sha256

# 部署
kubectl apply -f common-instancetypes-all-bundle.yaml
查詢已部署的資源
所有資源皆附帶豐富的 label,方便使用 kubectl 查詢與篩選:
# 列出所有 4 vCPU 的 instance types
kubectl get virtualmachineclusterinstancetype \
  -l instancetype.kubevirt.io/cpu=4

# 列出特定版本部署的資源
kubectl get virtualmachineclusterinstancetype \
  -l instancetype.kubevirt.io/common-instancetypes-version=v1.3.0

# 列出所有 Linux 類型的 preferences
kubectl get virtualmachineclusterpreference \
  -l instancetype.kubevirt.io/os-type=linux