Common Instancetypes — 資源類型目錄
概述
common-instancetypes 並非傳統的 Kubernetes controller 專案,而是一個 YAML 資源定義倉庫。它使用 KubeVirt 的 instancetype.kubevirt.io/v1beta1 API 定義四種 CRD 資源類型,並透過單元測試、功能測試與 schema 驗證來確保資源定義的正確性。
CRD 型別定義
本專案定義四種 KubeVirt CRD 資源,分為 Cluster 層級(全叢集共用)與 Namespaced 層級(單一命名空間):
| 資源類型 | 範圍 | 用途 |
|---|---|---|
VirtualMachineClusterInstancetype | Cluster | 定義全叢集可用的 VM 硬體規格 |
VirtualMachineInstancetype | Namespaced | 定義命名空間內的 VM 硬體規格 |
VirtualMachineClusterPreference | Cluster | 定義全叢集可用的 OS 偏好設定 |
VirtualMachinePreference | Namespaced | 定義命名空間內的 OS 偏好設定 |
Instancetype 範例(U 系列)
# instancetypes/u/1/sizes.yaml
apiVersion: instancetype.kubevirt.io/v1beta1
kind: VirtualMachineClusterInstancetype
metadata:
  name: "u1.medium"
  labels:
    instancetype.kubevirt.io/cpu: "1"
    instancetype.kubevirt.io/memory: "4Gi"
    instancetype.kubevirt.io/size: "medium"
spec:
  cpu:
    guest: 1
  memory:
    guest: "4Gi"
Instancetype 範例(RT 系列 — Realtime)
# instancetypes/rt/1/rt1.yaml
kind: VirtualMachineClusterInstancetype
metadata:
  name: "rt"
  labels:
    instancetype.kubevirt.io/dedicatedCPUPlacement: "true"
    instancetype.kubevirt.io/isolateEmulatorThread: "true"
    instancetype.kubevirt.io/numa: "true"
    instancetype.kubevirt.io/realtime: "true"
    instancetype.kubevirt.io/hugepages: "1Gi"
spec:
  annotations:
    cpu-load-balancing.crio.io: disable
    cpu-quota.crio.io: disable
    irq-load-balancing.crio.io: disable
  cpu:
    dedicatedCPUPlacement: true
    isolateEmulatorThread: true
    numa:
      guestMappingPassthrough: {}
    realtime: {}
  memory:
    hugepages:
      pageSize: 1Gi
Preference 範例
# preferences/fedora/requirements/requirements.yaml
apiVersion: instancetype.kubevirt.io/v1beta1
kind: VirtualMachinePreference
metadata:
  name: requirements
  labels:
    instancetype.kubevirt.io/required-cpu: "1"
    instancetype.kubevirt.io/required-memory: "2Gi"
spec:
  requirements:
    cpu:
      guest: 1
    memory:
      guest: 2Gi
Spec 結構
Instancetype Spec 欄位
Instancetype 定義虛擬機器的硬體資源配置。不同系列使用不同的欄位組合:
| 欄位 | 類型 | 說明 | 使用系列 |
|---|---|---|---|
cpu.guest | uint32 | vCPU 數量 | 全部 |
cpu.maxSockets | uint32 | 最大 socket 數,避免超額熱插拔 | CX |
cpu.dedicatedCPUPlacement | bool | 獨佔物理 CPU 核心 | CX, D, N, RT |
cpu.isolateEmulatorThread | bool | 隔離模擬器執行緒 | CX, D, N, RT |
cpu.numa.guestMappingPassthrough | object | NUMA 拓撲直通映射 | CX, RT |
cpu.realtime | object | 即時排程支援 | RT |
memory.guest | resource.Quantity | 記憶體容量(如 "4Gi") | 全部 |
memory.hugepages.pageSize | string | 大頁面大小("2Mi" 或 "1Gi") | CX, N |
memory.overcommitPercent | int | 記憶體超額配置百分比 | O |
ioThreadsPolicy | string | IO 執行緒策略("auto") | CX, D |
annotations | map | Pod annotations(如 CRI-O 調校) | N, RT |
各系列 Spec 特徵
- U 系列:僅使用
cpu.guest+memory.guest,最基本配置 - O 系列:加上
memory.overcommitPercent: 50 - D 系列:加上
dedicatedCPUPlacement+isolateEmulatorThread+ioThreadsPolicy - CX 系列:D 系列基礎加上
numa+hugepages+maxSockets - N 系列:加上
dedicatedCPUPlacement+isolateEmulatorThread+hugepages+ CRI-O annotations - RT 系列:N 系列基礎加上
numa+realtime
以 CX 系列為例,完整的 sizes 定義包含 maxSockets 和 hugepages:
# instancetypes/cx/1/sizes.yaml
apiVersion: instancetype.kubevirt.io/v1beta1
kind: VirtualMachineClusterInstancetype
metadata:
  name: "cx1.medium"
  labels:
    instancetype.kubevirt.io/cpu: "1"
    instancetype.kubevirt.io/memory: "2Gi"
    instancetype.kubevirt.io/size: "medium"
    instancetype.kubevirt.io/hugepages: "2Mi"
spec:
  cpu:
    guest: 1
    maxSockets: 1
  memory:
    guest: "2Gi"
    hugepages:
      pageSize: "2Mi"
Preference Spec 欄位
Preference 定義虛擬機器的 OS 偏好設定,透過 Kustomize components 組合而成:
| 欄位分類 | 主要欄位 | 說明 |
|---|---|---|
| CPU | cpu.preferredCPUTopology | CPU 拓撲(sockets、spread) |
cpu.spreadOptions.across | Spread 分布策略(SocketsCoresThreads) | |
| 裝置 | devices.preferredDiskBus | 磁碟匯流排(virtio、sata、scsi) |
devices.preferredInterfaceModel | 網路介面(virtio、e1000、e1000e、rtl8139) | |
devices.preferredNetworkInterfaceMultiQueue | 多佇列網路 | |
devices.preferredAutoattachInputDevice | 自動附加輸入裝置 | |
devices.preferredTPM.persistent | 持久化 TPM | |
devices.preferredRng | 隨機數生成器 | |
devices.preferredUseVirtioTransitional | VirtIO transitional 模式 | |
| 韌體 | firmware.preferredEfi.secureBoot | EFI Secure Boot |
firmware.preferredEfi.persistent | 持久化 EFI | |
| 功能 | features.preferredSmm | SMM(Secure Boot 所需) |
features.preferredHyperv.* | Hyper-V 擴展功能(Windows) | |
| 需求 | requirements.cpu.guest | 最低 CPU 需求 |
requirements.memory.guest | 最低記憶體需求 | |
requirements.architecture | 所需架構(amd64、arm64、s390x) | |
| 其他 | preferredArchitecture | 偏好架構 |
preferredTerminationGracePeriodSeconds | 終止寬限期 |
Windows Hyper-V 元件
Windows preference 使用 preferences/components/hyperv.yaml 注入完整的 Hyper-V 設定,包含 relaxed、vapic、vpindex、spinlocks、synic、synictimer、tlbflush、frequencies、reenlightenment、ipi、runtime、reset 等擴展功能以及時鐘偏移設定。
單元測試架構
單元測試位於 tests/unittests/,使用 Ginkgo v2 + Gomega 測試框架,驗證所有產生的 YAML bundle 檔案。
測試套件初始化
// tests/unittests/test_suite_test.go
const (
    clusterInstanceTypesBundlePath = "../../_build/common-clusterinstancetypes-bundle.yaml"
    clusterPreferencesBundlePath   = "../../_build/common-clusterpreferences-bundle.yaml"
)

var _ = BeforeSuite(func() {
    loadBundles()
    Expect(loadedVirtualMachineClusterInstanceTypes).ToNot(BeEmpty())
    Expect(loadedVirtualMachineClusterPreferences).ToNot(BeEmpty())
})
測試套件在 BeforeSuite 中使用泛型函式 FetchBundleResource[C clusterType] 解析 _build/ 目錄下的 bundle YAML 檔案,載入所有 VirtualMachineClusterInstancetype 和 VirtualMachineClusterPreference 資源。
測試結構
// tests/unittests/instancetype_test.go
var _ = Describe("Common instance types unit tests", func() {
    Context("VirtualMachineClusterPreference", func() {
        It("check version", func() { ... })
        It("check if labels match resources", func() { ... })
    })
    Context("VirtualMachineClusterInstanceType", func() {
        It("check version", func() { ... })
        It("check if labels match resources", func() { ... })
    })
})
測試分為兩大 Context,各自驗證:
- API 版本驗證 — 所有資源的
APIVersion必須為instancetype.kubevirt.io/v1beta1 - Label 與 Spec 一致性驗證 — 每個 label 值必須與對應的 spec 欄位匹配
Validator 函式對照表
測試透過 function map 將 label key 映射到對應的驗證函式:
| Validator 函式 | 驗證的 Label | 比對的 Spec 欄位 |
|---|---|---|
checkCPUInstanceType | instancetype.kubevirt.io/cpu | spec.cpu.guest |
checkMemoryInstanceType | instancetype.kubevirt.io/memory | spec.memory.guest |
checkSize | instancetype.kubevirt.io/size | 名稱中 . 後的部分 |
checkHugepages | instancetype.kubevirt.io/hugepages | spec.memory.hugepages.pageSize |
checkNuma | instancetype.kubevirt.io/numa | spec.cpu.numa != nil |
checkDedicatedCPUPlacement | instancetype.kubevirt.io/dedicatedCPUPlacement | spec.cpu.dedicatedCPUPlacement |
checkIsolateEmulatorThread | instancetype.kubevirt.io/isolateEmulatorThread | spec.cpu.isolateEmulatorThread |
checkRealtime | instancetype.kubevirt.io/realtime | spec.cpu.realtime != nil |
instancetypeCheckVendor | instancetype.kubevirt.io/vendor | 固定值 kubevirt.io |
checkCPUPreferenceType | instancetype.kubevirt.io/required-cpu | spec.requirements.cpu.guest |
checkMemoryPreferenceType | instancetype.kubevirt.io/required-memory | spec.requirements.memory.guest |
checkDisplayName | openshift.io/display-name | metadata.name |
checkPreferredArchitecture | instancetype.kubevirt.io/preferred-architecture | spec.preferredArchitecture |
checkRequiredArchitecture | instancetype.kubevirt.io/required-architecture | spec.requirements.architecture |
preferenceCheckVendor | instancetype.kubevirt.io/vendor | 固定值 kubevirt.io |
跳過的 Label
以下 label 不進行 spec 比對驗證(屬於純元資料標籤):instancetype.kubevirt.io/arch、instancetype.kubevirt.io/os-type、instancetype.kubevirt.io/deprecated、instancetype.kubevirt.io/common-instancetypes-version、instancetype.kubevirt.io/version、instancetype.kubevirt.io/class、instancetype.kubevirt.io/icon-pf
功能測試架構
功能測試位於 tests/functests/,需要連接實際的 KubeVirt 叢集進行端對端驗證。
測試環境
// tests/functests/test_suite_test.go
const testNamespace = "common-instancetype-functest"

var _ = BeforeSuite(func() {
    // 建立 KubeVirt client
    virtClient, err = kubecli.GetKubevirtClientFromRESTConfig(config)
    // 偵測叢集架構(amd64/arm64/s390x)
    preferenceArch = getClusterArch(virtClient)
    // 建立測試命名空間
    virtClient.CoreV1().Namespaces().Create(...)
    // 確認 CRD 資源已部署
    checkDeployedResources()
})
測試類型
功能測試分為三大類:
1. VM 建立測試
It("[test_id:10735] VirtualMachine using an instancetype can be created", func() {
    for _, instancetype := range getClusterInstancetypes(virtClient) {
        vm = randomVM(&v1.InstancetypeMatcher{Name: instancetype.Name}, nil, v1.RunStrategyHalted)
        vm, err = virtClient.VirtualMachine(testNamespace).Create(...)
        Expect(err).ToNot(HaveOccurred())
    }
})
2. Preference 需求驗證測試
[test_id:10736]— 記憶體不足時被拒絕(建立僅 64M 的 instancetype)[test_id:TODO]— CPU 不足時被拒絕(建立僅 1 vCPU 的 instancetype)[test_id:10737]— 滿足需求時可成功建立[test_id:TODO]— 每個 preference 至少有一個相容的 instancetype
3. Linux / Windows 開機啟動測試
使用 DescribeTable 搭配 container disk image 進行參數化測試:
DescribeTable("a Linux guest with",
    func(containerDisk, instancetype string, preferences map[string]string, testFns []testFn) {
        vm = randomVM(...)
        addContainerDisk(vm, containerDisk)
        addCloudInitWithAuthorizedKey(vm, privKey)
        vm, err = virtClient.VirtualMachine(testNamespace).Create(...)
        expectVMToBeReady(virtClient, vm.Name, defaultVMReadyTimeout)
        for _, testFn := range testFns {
            testFn(virtClient, vm.Name)
        }
    },
    Entry("[test_id:10738] Fedora", fedoraContainerDisk, "u1.small", ...),
    Entry("[test_id:10745] CentOS Stream 9", centosStream9ContainerDisk, "u1.small", ...),
    // ... 更多作業系統
)
Container Disk 來源
| 類別 | 來源 | 範例 |
|---|---|---|
| 公開映像 | quay.io/containerdisks/ | Fedora、CentOS、Ubuntu、Debian、OpenSUSE |
| 私有映像 | registry:5000/ | RHEL、Oracle Linux、SLES、Windows 全系列 |
| 專用測試映像 | registry:5000/ | Validation OS (windows.11 preference 測試用) |
驗證函式
| 函式 | 說明 |
|---|---|
expectVMToBeReady | 等待 VM status.ready == true(預設 300 秒逾時) |
expectGuestAgentToBeConnected | 等待 QEMU Guest Agent 連線(透過 GuestOsInfo API) |
expectSSHToRunCommandOnLinux | 使用 ED25519 金鑰透過 PortForward SSH 連線執行 echo hello |
expectSSHToRunCommandOnWindows | 使用 Administrator / Administrator 密碼 SSH 連線 |
多架構支援
功能測試透過 preferences map[string]string 參數支援 amd64、arm64、s390x 三種架構。BeforeSuite 會自動偵測叢集節點架構,不支援的架構會自動 Skip。
Makefile 驗證目標
# 預設目標:依序執行 lint、validate、readme、test-lint、test
all: lint validate readme test-lint test
測試相關目標
| 目標 | 指令 | 說明 |
|---|---|---|
make test | cd tests && go test -v -timeout 0 ./unittests/... | 執行單元測試(需先 make generate) |
make test-fmt | cd tests && gofumpt -w -extra . | 格式化測試程式碼 |
make test-vet | cd tests && go vet ./... | Go vet 靜態分析 |
make test-lint | cd tests && golangci-lint run --timeout 5m | golangci-lint 靜態分析(含 test-vet) |
功能測試目標
| 目標 | 說明 |
|---|---|
make functest | 使用 $KUBECONFIG 對既有叢集執行功能測試 |
make cluster-functest | 使用 kubevirtci 叢集的 kubeconfig 執行功能測試 |
make kubevirt-functest | 使用 kubevirt.sh 管理的叢集執行功能測試 |
功能測試統一使用 Ginkgo flags:
cd tests && go test -v -timeout 0 ./functests/... -ginkgo.v -ginkgo.randomize-all驗證與建置目標
| 目標 | 依賴 | 說明 |
|---|---|---|
make generate | kustomize, yq | 使用 Kustomize 產生四個目錄的 YAML 與 _build/ bundle |
make lint | generate | 執行 scripts/lint.sh(可透過容器執行) |
make validate | generate, schema, kubeconform | 使用 kubeconform 驗證所有 YAML |
make schema | — | 從 KubeVirt swagger.json 產生 JSON Schema |
make readme | generate | 自動產生 README 文件 |
make check-tree-clean | readme, test-fmt | 確保 git 工作目錄乾淨 |
Schema 驗證
Schema 生成 — scripts/schema.sh
從 KubeVirt 的 OpenAPI spec 生成 JSON Schema:
#!/bin/bash
# scripts/schema.sh
KUBEVIRT_SWAGGER_URL=https://raw.githubusercontent.com/kubevirt/kubevirt/${KUBEVIRT_TAG}/api/openapi-spec/swagger.json
SCHEMA_DIR=_schemas/${KUBEVIRT_TAG}
mkdir -p "${SCHEMA_DIR}"

openapi2jsonschema --stand-alone --expanded --strict \
  -o "${SCHEMA_DIR}" "${KUBEVIRT_SWAGGER_URL}"
此腳本使用 openapi2jsonschema 工具,從 KubeVirt 的 swagger.json 提取 CRD 定義並轉換為獨立的 JSON Schema 檔案,存放於 _schemas/${KUBEVIRT_TAG}/ 目錄下。
KUBEVIRT_TAG
KUBEVIRT_TAG 預設為 main(定義在 Makefile 中),指向 KubeVirt 主分支的 API 定義。Schema 生成透過 scripts/cri.sh 包裝,可在容器中執行。
YAML 驗證 — scripts/validate.sh
使用 kubeconform 驗證所有產生的 YAML:
#!/bin/bash
# scripts/validate.sh

# 驗證各 kustomization build 的輸出
for f in ./ VirtualMachineClusterInstancetypes VirtualMachineClusterPreferences \
         VirtualMachineInstancetypes VirtualMachinePreferences; do
    kustomize build ${f} | kubeconform -exit-on-error -strict \
      -schema-location "_schemas/${KUBEVIRT_TAG}/{{ .ResourceKind }}.json"
done

# 驗證產生的 bundle 檔案
for f in _build/common-*-bundle.yaml; do
    kubeconform -exit-on-error -strict \
      -schema-location "_schemas/${KUBEVIRT_TAG}/{{ .ResourceKind }}.json" "${f}"
done
驗證流程
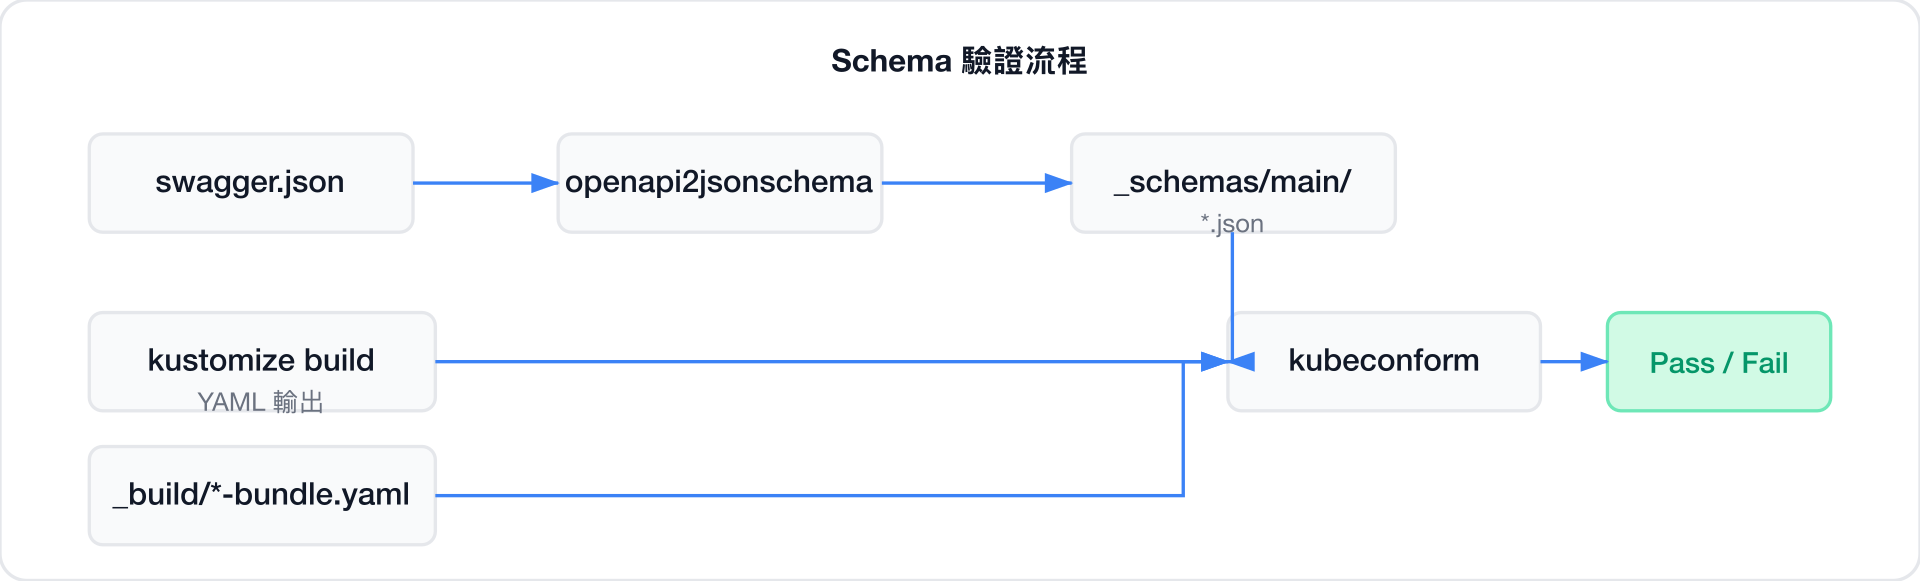
驗證重點:
-strict模式:拒絕 schema 中未定義的額外欄位-exit-on-error:遇到第一個錯誤立即停止.ResourceKind模板:根據資源類型(如VirtualMachineClusterInstancetype)自動選擇對應的 schema 檔案- 同時驗證 kustomize build 輸出與預建的 bundle 檔案,確保兩者一致