VM 最佳化進階指南 — 深度調校手冊
本章導讀
本章涵蓋 KubeVirt VM 最佳化的進階主題,包括 CPU 拓樸設計、NUMA 感知排程、Realtime VM 配置、設備選擇策略、記憶體管理,以及 Guest OS 層級最佳化。這些主題補充效能調校指南(CPU Pinning、Hugepages、IOThreads、SR-IOV),適合需要進一步榨乾效能的工程師閱讀。
相關章節
- 效能調校指南 — CPU Pinning、Hugepages、IOThreads、SR-IOV 配置
- QEMU/KVM 虛擬化核心 — libvirt Domain XML 轉換與 QEMU 底層原理
1. CPU 拓樸設計最佳化
1.1 拓樸三要素:Sockets、Cores、Threads
虛擬 CPU 拓樸由三個層次組成,對應到真實 CPU 的硬體模型:

| 層次 | 說明 | YAML 欄位 |
|---|---|---|
| Socket | 代表一顆實體 CPU 插槽,也是 NUMA 節點的邊界 | spec.domain.cpu.sockets |
| Core | 每個 Socket 內的實體核心數 | spec.domain.cpu.cores |
| Thread | 每個核心的硬體執行緒(Hyper-Threading) | spec.domain.cpu.threads |
總 vCPU 數量 = sockets × cores × threads
Guest OS 看到的拓樸(lscpu 輸出範例)
# Guest 內執行 lscpu
Architecture:        x86_64
CPU(s):              8
On-line CPU(s) list: 0-7
Thread(s) per core:  2      ← threads
Core(s) per socket:  4      ← cores
Socket(s):           1      ← sockets
NUMA node(s):        1
1.2 拓樸設計對效能的影響
拓樸設計直接影響 Guest OS 的排程行為與記憶體存取模式:
NUMA-aware 拓樸的重要性:
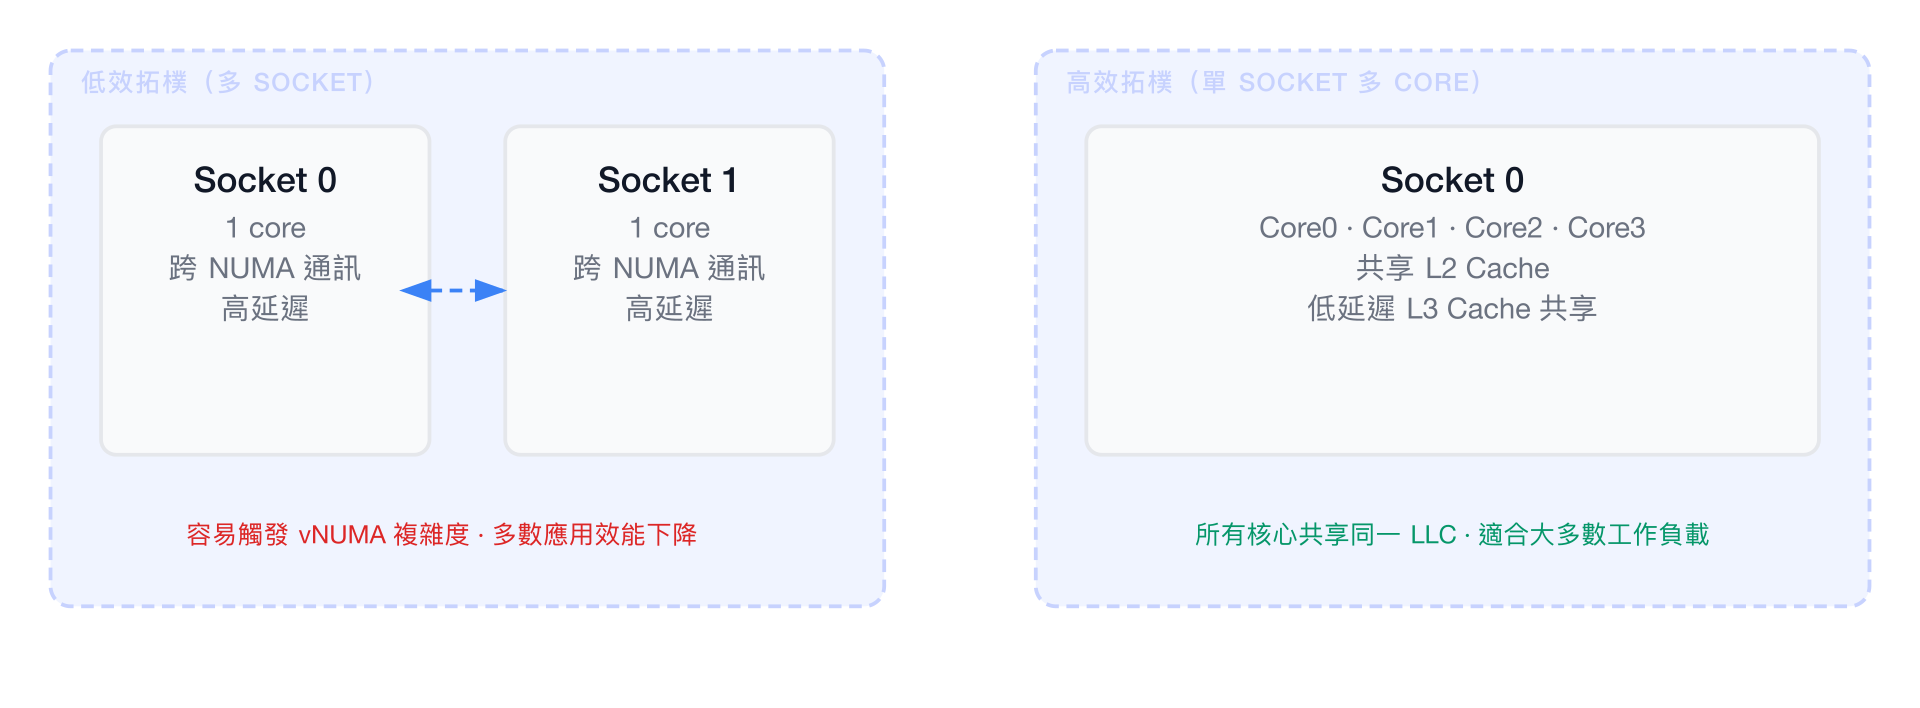
- 當 vCPU 數量超過單一 NUMA 節點的核心數時,Guest OS 會看到多個 vNUMA 節點
- Guest OS 的記憶體分配器(如 jemalloc、glibc)會嘗試 NUMA-local 分配
- 若 vNUMA 映射與物理 NUMA 不一致,記憶體存取會穿越 QPI/UPI 互連,延遲增加 30~80%
1.3 不同工作負載的最佳拓樸
單執行緒應用(資料庫 single-threaded workload)
spec:
  template:
    spec:
      domain:
        cpu:
          sockets: 1
          cores: 8
          threads: 1
          dedicatedCPUPlacement: true
理由: 所有 vCPU 同屬一個 Socket,共享 L3 Cache。單執行緒應用雖然只使用一個 vCPU,但其他 vCPU 可輔助 OS 背景工作,且相同 NUMA 節點確保記憶體低延遲。
多執行緒應用(Web Server、Message Queue)
spec:
  template:
    spec:
      domain:
        cpu:
          sockets: 2
          cores: 4
          threads: 2   # Hyper-Threading 增加並行度
          dedicatedCPUPlacement: true
理由: 啟用 Hyper-Threading(threads: 2)對 I/O 密集型工作負載有益,但對計算密集型反而可能降低效能(共享執行資源)。
HPC / MPI 工作負載(科學計算、AI 訓練)
spec:
  template:
    spec:
      domain:
        cpu:
          sockets: 2        # 對應物理機的 2 個 NUMA 節點
          cores: 16         # 每 Socket 16 Core
          threads: 1        # HPC 通常關閉 HT
          dedicatedCPUPlacement: true
          numa:
            guestMappingPassthrough: {}
        memory:
          hugepages:
            pageSize: "1Gi"
          guest: 64Gi
理由: guestMappingPassthrough 將物理 NUMA 拓樸直接透傳給 Guest,MPI 程序可以做 NUMA-local 記憶體分配,避免跨 NUMA 通訊瓶頸。
1.4 CPU 型號選擇:host-model vs host-passthrough vs 指定型號
| 模式 | 說明 | 遷移相容性 | 最佳化程度 |
|---|---|---|---|
host-passthrough | 完整透傳宿主機 CPU 特性(含 AVX-512 等) | ❌ 無法跨異構節點遷移 | ⭐⭐⭐⭐⭐ |
host-model | 使用宿主機 CPU 型號的基線特性集 | ✅ 同廠商 CPU 可遷移 | ⭐⭐⭐⭐ |
指定型號(如 Skylake-Client) | 固定 CPU 特性集 | ✅ 跨版本可遷移 | ⭐⭐⭐ |
# 最高效能(無法遷移)
spec:
  domain:
    cpu:
      model: host-passthrough
      features:
        - name: avx512f
          policy: require
        - name: pdpe1gb     # 1G HugePages 硬體支援
          policy: require

# 可遷移(同廠商)
spec:
  domain:
    cpu:
      model: host-model

# 指定特定 CPU 型號(最高相容性)
spec:
  domain:
    cpu:
      model: Cascadelake-Server
      features:
        - name: pcid
          policy: require
2. NUMA 拓樸感知排程
2.1 什麼是 NUMA 以及為何重要
NUMA(Non-Uniform Memory Access)是現代多路 CPU 系統的記憶體架構:
┌─────────────────────────────────────────────────────────────────┐
│  單路系統(UMA):                                               │
│                                                                 │
│  CPU 0 ──→ 記憶體控制器 ──→ DRAM(所有 CPU 等距存取)           │
│  CPU 1 ──↗                                                      │
│                                                                 │
│  雙路系統(NUMA):                                              │
│                                                                 │
│  ┌─────────────┐  QPI/UPI 互連  ┌─────────────┐                │
│  │  NUMA 0     │◄──────────────►│  NUMA 1     │                │
│  │  CPU 0-23   │                │  CPU 24-47  │                │
│  │  Memory 0   │                │  Memory 1   │                │
│  │  (local)    │                │  (local)    │                │
│  └─────────────┘                └─────────────┘                │
│                                                                 │
│  Local 存取延遲:~70 ns     Remote 存取延遲:~120 ns (+70%)      │
└─────────────────────────────────────────────────────────────────┘
當 VM 的 vCPU 橫跨多個物理 NUMA 節點,且 VM 記憶體未對齊到對應 NUMA 節點時,效能會顯著下降。
2.2 KubeVirt NUMA 透傳配置
guestMappingPassthrough 讓 KubeVirt 將宿主機的物理 NUMA 拓樸直接映射到 Guest:
apiVersion: kubevirt.io/v1
kind: VirtualMachineInstance
metadata:
  name: numa-passthrough-vm
spec:
  domain:
    cpu:
      cores: 8
      sockets: 2
      threads: 1
      dedicatedCPUPlacement: true
      numa:
        guestMappingPassthrough: {}   # 關鍵:透傳 NUMA 拓樸
    memory:
      hugepages:
        pageSize: "1Gi"
      guest: 16Gi
  affinity:
    nodeAffinity:
      requiredDuringSchedulingIgnoredDuringExecution:
        nodeSelectorTerms:
          - matchExpressions:
              - key: topology.kubernetes.io/numa-nodes
                operator: In
                values: ["2"]
2.3 Kubernetes Topology Manager 整合
KubeVirt NUMA 功能依賴 Kubernetes 節點的 Topology Manager 正確運作:
┌─────────────────────────────────────────────────────────────────┐
│  Kubernetes Node 設定需求                                        │
│                                                                 │
│  kubelet 參數:                                                  │
│  --topology-manager-policy=single-numa-node                     │
│  --cpu-manager-policy=static                                    │
│  --memory-manager-policy=Static                                 │
│                                                                 │
│  Topology Manager Policies:                                     │
│  ┌────────────────┬─────────────────────────────────────────┐   │
│  │ none (預設)    │ 不考慮 NUMA 對齊                          │   │
│  │ best-effort    │ 盡量對齊,失敗仍排程                      │   │
│  │ restricted     │ 嘗試對齊,失敗則拒絕                      │   │
│  │ single-numa-   │ 所有資源必須在同一 NUMA 節點              │   │
│  │ node           │ (最嚴格,HPC 使用)                      │   │
│  └────────────────┴─────────────────────────────────────────┘   │
└─────────────────────────────────────────────────────────────────┘
2.4 CPU Pinning + HugePages + NUMA 三合一配置
這是效能最高的組合,適用於延遲敏感的生產工作負載:
apiVersion: kubevirt.io/v1
kind: VirtualMachine
metadata:
  name: ultra-perf-vm
  annotations:
    # 告知 Kubernetes 排程器這個 Pod 需要 NUMA 對齊
    kubevirt.io/pci-topology-hints: "true"
spec:
  running: true
  template:
    metadata:
      annotations:
        cpu-load-balancing.crio.io: "disable"   # 停用 CRI-O CPU 負載平衡
    spec:
      domain:
        cpu:
          sockets: 1
          cores: 8
          threads: 2
          dedicatedCPUPlacement: true
          model: host-passthrough
          numa:
            guestMappingPassthrough: {}
        memory:
          hugepages:
            pageSize: "1Gi"
          guest: 16Gi
        devices:
          disks:
            - name: rootdisk
              disk:
                bus: virtio
          interfaces:
            - name: default
              model: virtio
              masquerade: {}
      networks:
        - name: default
          pod: {}
      volumes:
        - name: rootdisk
          persistentVolumeClaim:
            claimName: ultra-perf-vm-rootdisk
      nodeSelector:
        # 確保調度到有 NUMA 支援的節點
        feature.node.kubernetes.io/numa: "true"
      tolerations:
        - key: "high-performance"
          operator: "Exists"
          effect: "NoSchedule"
3. Realtime VM 配置
3.1 應用場景
Realtime VM 適用於對延遲有嚴格要求的工作負載:
| 場景 | 延遲需求 | 說明 |
|---|---|---|
| NFV(網路功能虛擬化) | < 100 µs | vRouter、vFirewall、5G UPF |
| 金融交易系統 | < 1 ms | 高頻交易(HFT)、訂單處理 |
| 工業控制系統 | < 500 µs | PLC 模擬、SCADA 系統 |
| 音訊/視訊處理 | < 5 ms | 廣播級即時串流 |
3.2 節點前提條件
# 1. 確認節點安裝 Realtime 核心
uname -r
# 輸出範例:5.14.0-284.30.1.rt14.315.el9_2.x86_64(含 .rt 字樣)

# 2. 設定 isolcpus(開機參數)
# 在 /etc/default/grub 加入:
# GRUB_CMDLINE_LINUX="... isolcpus=2-23 nohz_full=2-23 rcu_nocbs=2-23"
# 意思是將 CPU 2-23 從 Linux 排程器隔離,專供 VM 使用

# 3. 確認 CPU 頻率調速器設為 performance
cpupower frequency-set -g performance
節點標籤(用於 VM 排程):
kubectl label node <node-name> \
  feature.node.kubernetes.io/cpu-cpuid.RTSCHED=true \
  realtime=true
3.3 KubeVirt Realtime VM 完整配置
apiVersion: kubevirt.io/v1
kind: VirtualMachine
metadata:
  name: realtime-nfv-vm
spec:
  running: true
  template:
    spec:
      domain:
        cpu:
          sockets: 1
          cores: 4
          threads: 1
          # 必要條件 1:專屬 CPU 綁定
          dedicatedCPUPlacement: true
          # 必要條件 2:NUMA 透傳
          numa:
            guestMappingPassthrough: {}
          # Realtime 設定
          realtime:
            mask: "0-3"     # 指定哪些 vCPU 使用 Realtime 排程
                            # 空值代表所有 vCPU
          model: host-passthrough
          features:
            - name: tsc-deadline
              policy: require   # 高精度計時器
        memory:
          hugepages:
            pageSize: "1Gi"
          guest: 4Gi
        devices:
          # 關鍵:隔離 QEMU 模擬器執行緒
          # 讓 QEMU emulator thread 使用獨立的 CPU,不干擾 vCPU
          useVirtioTransitional: false
          disks:
            - name: rootdisk
              disk:
                bus: virtio
                dedicatedIOThread: true   # IO Thread 也獨立
          interfaces:
            - name: default
              model: virtio
              masquerade: {}
          # QEMU 模擬器執行緒隔離(需要額外 CPU)
        cpu:
          isolatedEmulatorThread: true   # 為 QEMU emulator 分配獨立 CPU
      # 節點選擇器確保排程到 RT 節點
      nodeSelector:
        realtime: "true"
        feature.node.kubernetes.io/cpu-cpuid.RTSCHED: "true"
      # RT 節點通常有 taint
      tolerations:
        - key: "realtime"
          operator: "Equal"
          value: "true"
          effect: "NoSchedule"
      volumes:
        - name: rootdisk
          persistentVolumeClaim:
            claimName: realtime-nfv-rootdisk
3.4 QEMU 排程類別說明
isolatedEmulatorThread: true 的效果:
未啟用 isolatedEmulatorThread:      啟用 isolatedEmulatorThread:
┌──────────────────────────────┐    ┌──────────────────────────────┐
│ CPU 0: vCPU 0                │    │ CPU 0: vCPU 0(純 Guest 執行)│
│ CPU 1: vCPU 1                │    │ CPU 1: vCPU 1(純 Guest 執行)│
│ CPU 2: vCPU 2 + QEMU emu     │    │ CPU 2: vCPU 2(純 Guest 執行)│
│        (互相干擾!)            │    │ CPU 3: vCPU 3(純 Guest 執行)│
│                              │    │ CPU 4: QEMU emulator(獨立)  │
│  → QEMU emulator 中斷 vCPU   │    │  → vCPU 不被 QEMU 工作干擾   │
│  → 延遲抖動(jitter)增加     │    │  → 延遲更穩定、jitter 更低    │
└──────────────────────────────┘    └──────────────────────────────┘
注意: 啟用 isolatedEmulatorThread: true 會額外消耗 1 個 CPU,需確保節點有足夠的隔離 CPU 資源。
4. 設備選擇最佳化:virtio vs 模擬設備 vs 直通
4.1 設備類型效能比較
| 設備類型 | CPU 額外負擔 | 延遲 | 頻寬 | 適用場景 |
|---|---|---|---|---|
| virtio-blk | 低 | 極低 | 極高 | Linux Guest 系統/資料磁碟 |
| virtio-scsi | 低 | 低 | 高 | 需要 SCSI 語義(trim/discard) |
| virtio-net | 低 | 極低 | 極高 | Linux Guest 網路 |
| e1000 | 中 | 中 | 中 | Windows(無 virtio 驅動)、相容性 |
| rtl8139 | 高 | 高 | 低 | 僅老舊系統相容 |
| SR-IOV VF | 極低 | 極低 | 極高 | 需要最低延遲的 NFV 場景 |
| USB(XHCI) | 低 | 低 | 低 | HID 設備(鍵盤、滑鼠) |
4.2 virtio-blk vs virtio-scsi 選擇指南
virtio-blk:                        virtio-scsi:
┌──────────────────────────┐       ┌──────────────────────────┐
│ 單一磁碟控制器            │       │ SCSI Host Bus Adapter    │
│ 每個磁碟一個 PCIe 裝置    │       │ 多磁碟共用一個控制器      │
│                          │       │                          │
│ ✅ 最低延遲               │       │ ✅ 支援 SCSI TRIM/Discard │
│ ✅ 最高 IOPS              │       │ ✅ 最多 255 個磁碟         │
│ ✅ 支援 multiqueue        │       │ ✅ 支援磁碟序號(serial)  │
│ ❌ 不支援磁碟熱插拔        │       │ ✅ 支援熱插拔              │
│ ❌ PCIe 裝置數有上限       │       │ ⚠️  稍高 CPU 開銷          │
└──────────────────────────┘       └──────────────────────────┘

建議:系統磁碟用 virtio-blk,多磁碟/需要熱插拔用 virtio-scsi
4.3 virtio-net Multiqueue 配置
Multiqueue 讓多個 vCPU 可以並行處理網路封包,顯著提升網路吞吐量:
apiVersion: kubevirt.io/v1
kind: VirtualMachine
metadata:
  name: high-net-vm
spec:
  template:
    spec:
      domain:
        cpu:
          sockets: 1
          cores: 4
          threads: 2       # 8 vCPU → multiqueue 最多 8 個佇列
        devices:
          # 啟用網路 Multiqueue
          networkInterfaceMultiqueue: true
          # 磁碟使用 virtio-blk
          disks:
            - name: rootdisk
              disk:
                bus: virtio         # 使用 virtio-blk
            - name: datadisk
              disk:
                bus: virtio-scsi    # 使用 virtio-scsi(需要熱插拔)
          interfaces:
            - name: default
              model: virtio         # virtio-net
              masquerade: {}
Guest 內啟用 Multiqueue(Linux):
# 確認網卡支援 multiqueue
ethtool -l eth0

# 設定 RX/TX 佇列數(建議等於 vCPU 數量)
ethtool -L eth0 combined 8

# 驗證設定
ethtool -l eth0
# Combined: 8
4.4 vhost-net vs Userspace virtio 效能比較
vhost-net(預設):                  Userspace virtio(DPDK/OVS-DPDK):
┌──────────────────────────┐       ┌──────────────────────────┐
│ Guest virtio-net         │       │ Guest virtio-net         │
│         ↕ virtqueue      │       │         ↕ virtqueue      │
│ QEMU(userspace)         │       │ DPDK PMD(userspace)     │
│         ↕ tap           │       │         ↕ vhost-user    │
│ vhost-net(kernel)      │       │ OVS-DPDK / VPP           │
│         ↕               │       │         ↕               │
│ Host network stack       │       │ Physical NIC(bypass OS) │
└──────────────────────────┘       └──────────────────────────┘
  適合:一般工作負載                   適合:NFV、高 PPS 需求
  延遲:~50-200 µs                   延遲:~5-20 µs
  CPU 開銷:低                       CPU 開銷:高(polling 模式)
5. 記憶體氣球(Memory Balloon)與 KSM
5.1 Memory Balloon 原理
Memory Balloon 是一種動態記憶體管理機制:
宿主機記憶體壓力高時(inflate):      宿主機記憶體充足時(deflate):
┌──────────────────────────┐         ┌──────────────────────────┐
│  Guest Memory 4GB        │         │  Guest Memory 4GB        │
│  ┌────────────────────┐  │         │  ┌────────────────────┐  │
│  │  Balloon Driver    │  │         │  │  Balloon Driver    │  │
│  │  [膨脹:佔用 1GB]   │  │         │  │  [收縮:釋放記憶體] │  │
│  │  ████████          │  │         │  │                    │  │
│  └────────────────────┘  │         │  └────────────────────┘  │
│  可用記憶體:3GB           │         │  可用記憶體:4GB           │
│  Host 回收到:1GB          │         │  Host 交還回:1GB          │
└──────────────────────────┘         └──────────────────────────┘
工作原理:
- 宿主機記憶體不足時,KVM 向 Guest 的 balloon driver 發送膨脹信號
- Balloon driver 向 Guest OS 申請記憶體並「佔住」
- Guest 不再使用這些記憶體,宿主機可以回收
- 此過程對 Guest 應用程式透明(但 Guest 可用記憶體減少)
5.2 KubeVirt Balloon 配置
apiVersion: kubevirt.io/v1
kind: VirtualMachine
metadata:
  name: balloon-vm
spec:
  template:
    spec:
      domain:
        devices:
          # 啟用 Memory Balloon(預設已啟用)
          memBalloon:
            model: virtio
        memory:
          guest: 8Gi       # Guest 最大可用記憶體
        resources:
          requests:
            memory: 4Gi    # Pod 初始請求記憶體(可低於 Guest 記憶體)
Balloon 使用建議:
| 場景 | 建議 | 原因 |
|---|---|---|
| 通用伺服器 VM | ✅ 啟用 | 記憶體使用率波動大,balloon 可提高整體使用率 |
| 資料庫 VM | ⚠️ 謹慎使用 | Balloon 可能導致 OOM 或記憶體壓力,影響查詢效能 |
| Realtime / NFV VM | ❌ 停用 | Balloon inflate 會造成 Guest 記憶體壓力和 jitter |
| 記憶體大量超賣環境 | ✅ 建議 | 配合 KSM 可大幅提高 VM 密度 |
停用 Balloon 的配置:
spec:
  domain:
    devices:
      memBalloon:
        model: none   # 不安裝 balloon 設備
5.3 KSM(Kernel Samepage Merging)
KSM 是宿主機核心的功能,掃描不同 VM 的記憶體頁面,將相同內容的頁面合併為一個共享頁面(Copy-on-Write):
未啟用 KSM:                           啟用 KSM:
┌────────────────────────────┐        ┌────────────────────────────┐
│ VM1: kernel page 0 [4KB]   │        │                            │
│ VM2: kernel page 0 [4KB]   │  KSM   │   Shared Page [4KB]        │
│ VM3: kernel page 0 [4KB]   │ ────►  │     ↑    ↑    ↑            │
│ VM4: kernel page 0 [4KB]   │        │   VM1   VM2   VM3  VM4     │
│                            │        │                            │
│  總使用:4 × 4KB = 16KB     │        │  總使用:1 × 4KB = 4KB     │
│  記憶體節省:0%              │        │  記憶體節省:75%            │
└────────────────────────────┘        └────────────────────────────┘
KSM 的權衡取捨:
| 考量面 | 說明 |
|---|---|
| ✅ 記憶體節省 | 相同 OS 的 VM 可節省 20-60% 記憶體,提高 VM 密度 |
| ⚠️ CPU 開銷 | KSM 掃描執行緒持續消耗 CPU(通常 1-5%) |
| ⚠️ Write 延遲 | Copy-on-Write 觸發時有額外頁面複製延遲 |
| ❌ 安全風險 | 側通道攻擊(Spectre/Meltdown)可能利用共享頁面 |
宿主機啟用 KSM:
# 啟用 KSM
echo 1 > /sys/kernel/mm/ksm/run

# 設定掃描參數(調低延遲,調高 CPU)
echo 1000 > /sys/kernel/mm/ksm/pages_to_scan    # 每次掃描頁數
echo 20   > /sys/kernel/mm/ksm/sleep_millisecs   # 掃描間隔(ms)

# 查看合併統計
cat /sys/kernel/mm/ksm/pages_shared       # 已合併頁面數
cat /sys/kernel/mm/ksm/pages_sharing      # 使用合併頁面的 VM 數
安全注意事項
在多租戶環境(不同客戶 VM 共存)中,建議停用 KSM 以避免側通道攻擊風險。KubeVirt 本身不直接管理 KSM,由宿主機 OS 控制。
6. Guest OS 層級最佳化
6.1 Windows VM 的 virtio 驅動
Windows 預設不包含 virtio 驅動,需要額外安裝:
apiVersion: kubevirt.io/v1
kind: VirtualMachine
metadata:
  name: windows-vm
spec:
  template:
    spec:
      domain:
        devices:
          disks:
            - name: windowsdisk
              disk:
                bus: sata       # 安裝前用 SATA(Windows 原生支援)
            - name: virtio-drivers
              cdrom:
                bus: sata
                readonly: true
          interfaces:
            - name: default
              model: e1000      # 安裝前先用 e1000(Windows 原生支援)
              masquerade: {}
      volumes:
        - name: windowsdisk
          persistentVolumeClaim:
            claimName: windows-disk
        - name: virtio-drivers
          containerDisk:
            image: quay.io/kubevirt/virtio-container-disk:latest
安裝流程:
- 用 SATA + e1000 啟動 Windows,安裝系統
- 掛載
virtio-container-diskISO - 安裝 virtio 驅動(disk、net、balloon、serial、rng)
- 將磁碟改為
bus: virtio,網卡改為model: virtio - 重新啟動驗證效能提升
6.2 Linux Guest 核心參數最佳化
在 Guest 的 /etc/default/grub 加入以下參數:
GRUB_CMDLINE_LINUX="... \
  elevator=none \          # 使用 none(直接送給 virtio-blk)/ 或 mq-deadline
  no_timer_check \         # 避免開機時 timer 警告
  clocksource=tsc \        # 使用 TSC 計時器(虛擬機內最穩定)
  tsc=reliable \           # 告知核心 TSC 可信賴
  nohz=on \                # 動態時鐘節拍(省 CPU)
  transparent_hugepage=never \ # 關閉 THP(避免 Guest 內碎片,HugePages 已在 Host 層處理)
  selinux=0 \              # 可選:在非安全敏感環境停用 SELinux(減少 overhead)
"
說明表:
| 參數 | 效果 | 適用場景 |
|---|---|---|
elevator=none | 跳過 I/O 排程器,直接送 virtio | SSD / NVMe 儲存 |
clocksource=tsc | 使用 CPU TSC 作為時鐘來源,避免 VM exit | 需要高精度計時 |
transparent_hugepage=never | 停用 THP 自動合併,避免 Guest 內延遲尖峰 | 已使用 HugePages 的高效能 VM |
nohz=on | 動態時鐘節拍,idle CPU 不產生中斷 | 通用省電 |
6.3 QEMU Guest Agent 整合
QEMU Guest Agent(QGA)是在 Guest 內執行的 daemon,透過 virtio-serial 通道與宿主機通訊:
宿主機(KubeVirt)                    Guest OS
┌─────────────────────────────┐      ┌─────────────────────────────┐
│  virt-handler               │      │  qemu-guest-agent           │
│  ↓                          │      │  ↑                          │
│  libvirt / QEMU Monitor     │◄────►│  /dev/virtio-ports/         │
│  (virtio-serial channel)    │      │  org.qemu.guest_agent.0     │
└─────────────────────────────┘      └─────────────────────────────┘
QGA 提供的功能:
| 功能 | KubeVirt 用途 |
|---|---|
| Graceful Shutdown | virtctl stop vm 傳送 ACPI 電源事件,QGA 確保 OS 正確關機 |
| Filesystem Freeze/Thaw | 建立 Snapshot 前凍結 FS,確保資料一致性 |
| Guest IP 回報 | VMI Status 中顯示 Guest 的 IP 位址 |
| Time Sync | QGA 輔助 Host-Guest 時間同步 |
| 執行指令 | virtctl guestosinfo 取得 Guest OS 資訊 |
啟用 QEMU Guest Agent 配置:
spec:
  domain:
    devices:
      # virtio-serial 通道(QGA 通訊用)
      channels:
        - name: guestagent
          serial:
            target:
              type: VirtIO
              name: org.qemu.guest_agent.0
Guest 內安裝(Linux):
# RHEL/CentOS/Fedora
dnf install -y qemu-guest-agent
systemctl enable --now qemu-guest-agent

# Ubuntu/Debian
apt install -y qemu-guest-agent
systemctl enable --now qemu-guest-agent
6.4 時鐘同步配置
VM 的時鐘源設定對效能和正確性都有重要影響:
spec:
  domain:
    clock:
      utc: {}        # 使用 UTC 時區(Linux 推薦)
      # 或
      # timezone: "Asia/Taipei"

      timer:
        - name: hpet
          present: false   # 停用 HPET(效能差,Linux VM 不需要)
        - name: pit
          tickPolicy: delay
        - name: rtc
          tickPolicy: catchup    # RTC 落後時追上(適合暫停後恢復)
          track: guest
        - name: hypervclock
          present: false         # 僅 Windows 需要;Linux 不需要
        - name: tsc
          present: true
          frequency: "2000000000"  # 固定 TSC 頻率(適合遷移後穩定計時)
時鐘策略說明:
| Timer | tickPolicy | 說明 |
|---|---|---|
| RTC | catchup | VM 暫停後恢復,RTC 快速追上 real time |
| RTC | delay | VM 暫停後恢復,RTC 保持暫停前的時間 |
| PIT | discard | 跳過積累的 tick(最低 overhead,但 Guest 可能以為沒過時間) |
| TSC | fixed freq | 遷移後 TSC 頻率一致,避免計時誤差 |
7. 資源請求與限制調校策略
7.1 VM Spec 與 Pod Resource 的關係
KubeVirt 的每個 VMI 對應一個 virt-launcher Pod,Pod 的資源需求由 VM 規格決定:
VM Spec                              virt-launcher Pod
┌──────────────────────────┐        ┌──────────────────────────┐
│  domain.cpu.cores: 4     │        │  resources:              │
│  domain.cpu.threads: 2   │──────► │    requests:             │
│  → 8 vCPU                │        │      cpu: "8"            │
│                          │        │    limits:               │
│  domain.memory.guest:    │        │      cpu: "8"            │
│    8Gi                   │──────► │    requests:             │
│  + QEMU overhead         │        │      memory: "8.5Gi"     │
│    (~500MB-1GB)          │        │    limits:               │
│                          │        │      memory: "8.5Gi"     │
└──────────────────────────┘        └──────────────────────────┘
7.2 QEMU 程序的記憶體 Overhead
QEMU 本身的記憶體用量除了 Guest 記憶體之外還包含:
| 組成部分 | 典型大小 | 說明 |
|---|---|---|
| QEMU 程序本體 | ~50-100 MB | QEMU 二進位檔與程式庫 |
| 每個虛擬裝置 | ~1-10 MB | virtio-net、virtio-blk 等裝置狀態 |
| 每個 vCPU | ~1-2 MB | vCPU 狀態、寄存器等 |
| Video RAM | ~16-64 MB | 顯示記憶體(預設 16MB) |
| 頁表 Overhead | ~0.1% Guest 記憶體 | Extended Page Tables |
| 總 Overhead(8vCPU + 2 設備) | ~200-500 MB |
設定 overcommitGuestOverhead 避免 OOM:
spec:
  domain:
    resources:
      # 讓 KubeVirt 自動計算並加入 QEMU Overhead
      overcommitGuestOverhead: false   # 預設 false,KubeVirt 自動加入 overhead
      requests:
        memory: 8Gi       # KubeVirt 實際會請求 8Gi + overhead
      limits:
        memory: 8Gi
若設定 overcommitGuestOverhead: true,KubeVirt 不會在 Pod 資源請求中加入 QEMU overhead,這可能導致節點記憶體壓力時 virt-launcher Pod 被 OOM Kill。
7.3 QoS 類別對 VM 的影響
Kubernetes 的 QoS 類別決定 Pod 被驅逐的優先順序:
QoS 類別            Pod 資源設定                    被驅逐優先順序
─────────────────────────────────────────────────────────────────
Guaranteed     requests == limits(CPU 和 Memory)    最低(最後被殺)
Burstable      requests < limits 或只設 requests      中等
BestEffort     完全不設 requests 和 limits             最高(最先被殺)
生產 VM 的建議(Guaranteed QoS):
spec:
  template:
    spec:
      domain:
        cpu:
          cores: 4
          sockets: 1
          threads: 1
          dedicatedCPUPlacement: true  # 強制 Guaranteed QoS
        resources:
          requests:
            memory: "8.5Gi"   # 8Gi guest + ~500Mi overhead
            cpu: "4"
          limits:
            memory: "8.5Gi"   # requests == limits → Guaranteed
            cpu: "4"
dedicatedCPUPlacement 的 QoS 要求
啟用 dedicatedCPUPlacement: true 時,Kubernetes CPU Manager 要求 Pod 必須是 Guaranteed QoS(即 CPU requests == limits 且為整數)。若 QoS 不符,VM 將無法啟動。
7.4 不同工作負載的資源策略
工作負載類型    CPU 策略                  記憶體策略
─────────────────────────────────────────────────────────────────
資料庫(MySQL) dedicatedCPU + 固定核心   足量 + Limits = Requests
Web Server     Shared CPU(超賣)        適度 Requests,較高 Limits
CI/CD Runner   Shared CPU(高超賣比)    低 Requests,高 Limits
NFV/Realtime   Realtime + isolcpu       HugePages,不允許超賣
Dev/Test VM    BestEffort               低 Requests,無 Limits
7.5 Namespace Resource Quota 考量
在多租戶叢集中,需考量 ResourceQuota 對 VM 的影響:
apiVersion: v1
kind: ResourceQuota
metadata:
  name: vm-quota
  namespace: prod-vms
spec:
  hard:
    # 計算資源配額
    requests.cpu: "64"
    limits.cpu: "64"
    requests.memory: "256Gi"
    limits.memory: "256Gi"
    # KubeVirt 特有:限制 VM 數量
    count/virtualmachines.kubevirt.io: "20"
    count/virtualmachineinstances.kubevirt.io: "20"
注意: 每個 VMI 的實際 Pod 資源 = VM 規格 + QEMU overhead,計算 quota 時需預留足夠空間。
8. 最佳化配置範本
8.1 高效能計算型 VM(HPC)
適用場景:科學計算、AI 訓練、CFD 模擬、MPI 工作負載
apiVersion: kubevirt.io/v1
kind: VirtualMachine
metadata:
  name: hpc-compute-vm
  labels:
    workload-type: hpc
spec:
  running: true
  template:
    metadata:
      annotations:
        cpu-load-balancing.crio.io: "disable"
        cpu-quota.crio.io: "disable"
    spec:
      domain:
        cpu:
          sockets: 2          # 對應物理 2 NUMA 節點
          cores: 16           # 每 NUMA 16 核
          threads: 1          # HPC 關閉 Hyper-Threading
          dedicatedCPUPlacement: true
          isolatedEmulatorThread: true   # QEMU emulator 獨立 CPU
          model: host-passthrough        # 開放所有 AVX/AVX-512 指令集
          numa:
            guestMappingPassthrough: {}  # 透傳物理 NUMA 拓樸
          realtime:
            mask: ""   # 所有 vCPU 使用 Realtime 排程
          features:
            - name: avx512f
              policy: require
            - name: avx512dq
              policy: require
        memory:
          hugepages:
            pageSize: "1Gi"    # 1GB HugePages
          guest: 128Gi
        resources:
          requests:
            memory: "130Gi"    # 128Gi + ~2Gi overhead
            cpu: "33"          # 32 vCPU + 1 emulator thread
          limits:
            memory: "130Gi"
            cpu: "33"
        devices:
          disks:
            - name: rootdisk
              disk:
                bus: virtio
                dedicatedIOThread: true
          interfaces:
            - name: default
              model: virtio
              masquerade: {}
          networkInterfaceMultiqueue: true
          # 停用 Memory Balloon(HPC 不需動態記憶體)
          memBalloon:
            model: none
      nodeSelector:
        realtime: "true"
        feature.node.kubernetes.io/cpu-cpuid.AVX512F: "true"
        topology.kubernetes.io/numa-nodes: "2"
      tolerations:
        - key: "hpc-node"
          operator: "Exists"
          effect: "NoSchedule"
      volumes:
        - name: rootdisk
          persistentVolumeClaim:
            claimName: hpc-vm-rootdisk
8.2 通用伺服器型 VM(General Purpose)
適用場景:Web 應用、API 服務、微服務、一般資料庫
apiVersion: kubevirt.io/v1
kind: VirtualMachine
metadata:
  name: general-server-vm
  labels:
    workload-type: general
spec:
  running: true
  template:
    spec:
      domain:
        cpu:
          sockets: 1
          cores: 4
          threads: 2           # Hyper-Threading:4核心看起來像 8 vCPU
          model: host-model    # 允許遷移
        memory:
          guest: 8Gi
        resources:
          requests:
            memory: "8.5Gi"   # 加入 QEMU overhead
            cpu: "4"          # 與 cores 相同(非 dedicatedCPU)
          limits:
            memory: "10Gi"    # 允許少量記憶體超賣
            cpu: "8"          # CPU 可短暫爆發到 8
        devices:
          disks:
            - name: rootdisk
              disk:
                bus: virtio
            - name: datadisk
              disk:
                bus: virtio-scsi   # 資料磁碟使用 SCSI(支援 TRIM)
          interfaces:
            - name: default
              model: virtio
              masquerade: {}
          networkInterfaceMultiqueue: true
          memBalloon:
            model: virtio        # 啟用 Balloon,允許動態記憶體調整
          rng: {}                # 虛擬亂數產生器(加速 /dev/random)
        clock:
          utc: {}
          timer:
            - name: rtc
              tickPolicy: catchup
            - name: pit
              tickPolicy: delay
            - name: hpet
              present: false
      volumes:
        - name: rootdisk
          persistentVolumeClaim:
            claimName: general-vm-rootdisk
        - name: datadisk
          persistentVolumeClaim:
            claimName: general-vm-datadisk
      networks:
        - name: default
          pod: {}
8.3 Windows 桌面型 VM
適用場景:遠端桌面服務(RDS)、Windows 應用程式測試、Office 工作環境
apiVersion: kubevirt.io/v1
kind: VirtualMachine
metadata:
  name: windows-desktop-vm
  labels:
    workload-type: windows-desktop
spec:
  running: true
  template:
    spec:
      domain:
        cpu:
          sockets: 1
          cores: 4
          threads: 2
          model: host-model
          features:
            - name: hypervisor
              policy: disable   # 避免 Guest 偵測到巢狀虛擬化
        memory:
          guest: 8Gi
        resources:
          requests:
            memory: "8.5Gi"
            cpu: "2"
          limits:
            memory: "9Gi"
            cpu: "8"
        clock:
          utc: {}
          timer:
            # Windows 需要的計時器
            - name: hypervclock
              present: true       # Hyper-V 相容時鐘(Windows 效能優化)
            - name: rtc
              tickPolicy: catchup
            - name: pit
              tickPolicy: delay
            - name: hpet
              present: false
        features:
          hyperv:
            relaxed: {}           # Hyper-V 放寬計時器需求
            vapic: {}             # 虛擬 APIC(降低中斷 overhead)
            spinlocks:
              spinlocks: 8191     # 自旋鎖重試次數
            vpindex: {}           # 虛擬處理器索引
            runtime: {}           # 執行時間計數器
            synictimer:
              direct: {}          # 合成計時器
            tlbflush: {}          # TLB 刷新最佳化
            frequencies: {}       # CPU 頻率資訊
            reenlightenment: {}   # 遷移後重新啟動 Hyper-V 功能
        devices:
          disks:
            - name: windowsdisk
              disk:
                bus: virtio       # 已安裝 virtio 驅動後使用
              bootOrder: 1
            - name: virtio-drivers
              cdrom:
                bus: sata
                readonly: true
              bootOrder: 2
          interfaces:
            - name: default
              model: virtio       # 已安裝 virtio 驅動後使用
              masquerade: {}
          # Windows 桌面環境裝置
          memBalloon:
            model: virtio         # 需要安裝 virtio-balloon 驅動
          rng: {}                 # 加速 Windows 亂數產生(CryptAPI)
          sound:
            model: ich9           # Intel HDA 音效(遠端桌面音訊)
          # QEMU Guest Agent 通訊通道
          channels:
            - name: guestagent
              serial:
                target:
                  type: VirtIO
                  name: org.qemu.guest_agent.0
      volumes:
        - name: windowsdisk
          persistentVolumeClaim:
            claimName: windows-desktop-rootdisk
        - name: virtio-drivers
          containerDisk:
            image: quay.io/kubevirt/virtio-container-disk:latest
      networks:
        - name: default
          pod: {}
      # Windows VM 通常需要較長的啟動時間
      readinessProbes:
        - exec:
            command:
              - cat
              - /dev/null
          initialDelaySeconds: 60
          periodSeconds: 10
最佳化決策速查表
工作負載特性                建議最佳化組合
──────────────────────────────────────────────────────────────────
最低延遲(NFV/RT)         dedicatedCPU + NUMA透傳 + 1GHugePages
                           + Realtime + isolatedEmulatorThread
                           + 停用Balloon + virtio-net multiqueue

最高吞吐(HPC)            host-passthrough + AVX-512
                           + NUMA透傳 + 1G HugePages
                           + dedicatedCPU + 多核multiqueue

高密度 VM(超賣)          shared CPU + Balloon + KSM
                           + virtio 設備 + Burstable QoS

Windows 相容性             HyperV features + hypervclock
                           + virtio drivers + QGA + sound

Live Migration 相容性      host-model(非 host-passthrough)
                           + TSC clocksource + catchup tickpolicy
──────────────────────────────────────────────────────────────────
延伸閱讀
- 效能調校指南 — CPU Pinning、Hugepages 詳細配置
- QEMU/KVM 虛擬化核心 — Domain XML 底層轉換原理
- Windows VM 最佳化 — Windows 完整最佳化流程