Bridge 與 Masquerade 網路模式
KubeVirt 提供多種網路綁定(Network Binding)模式,其中 Bridge 與 Masquerade 是最常用的兩種。本文深入說明兩者的工作原理、設定方式、適用場景與限制。
什麼是 Network Binding?
Network Binding 決定了 VM 的虛擬網路介面(vNIC)如何連接到 Pod 網路。KubeVirt 在兩個階段(Phase 1 和 Phase 2)完成這個過程。
兩階段網路設定架構
KubeVirt 使用兩階段方式設定 VM 網路,這是理解所有網路模式的基礎:
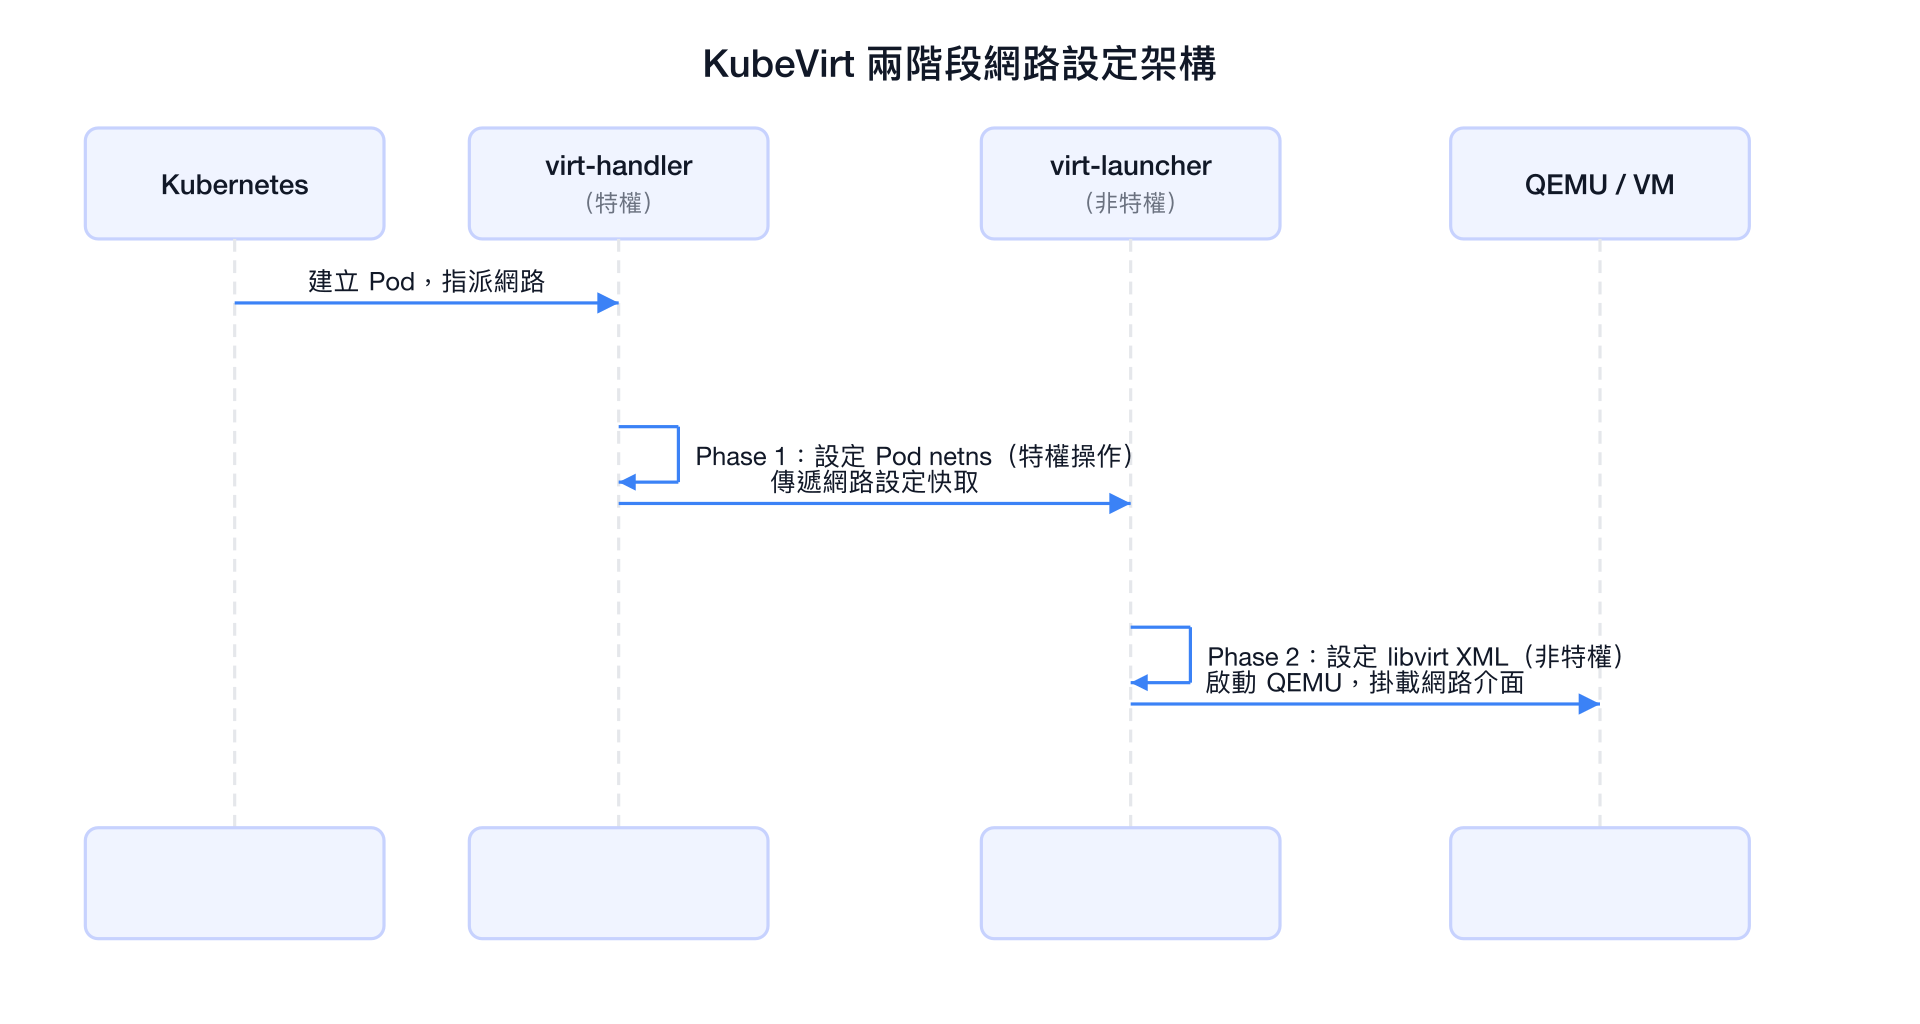
| 階段 | 執行者 | 特權需求 | 主要工作 |
|---|---|---|---|
| Phase 1 | virt-handler | 需要特權 | 修改 Pod network namespace,建立 bridge/nftables |
| Phase 2 | virt-launcher | 不需要特權 | 設定 libvirt XML,建立 tap 介面,啟動 QEMU |
Bridge 模式
工作原理
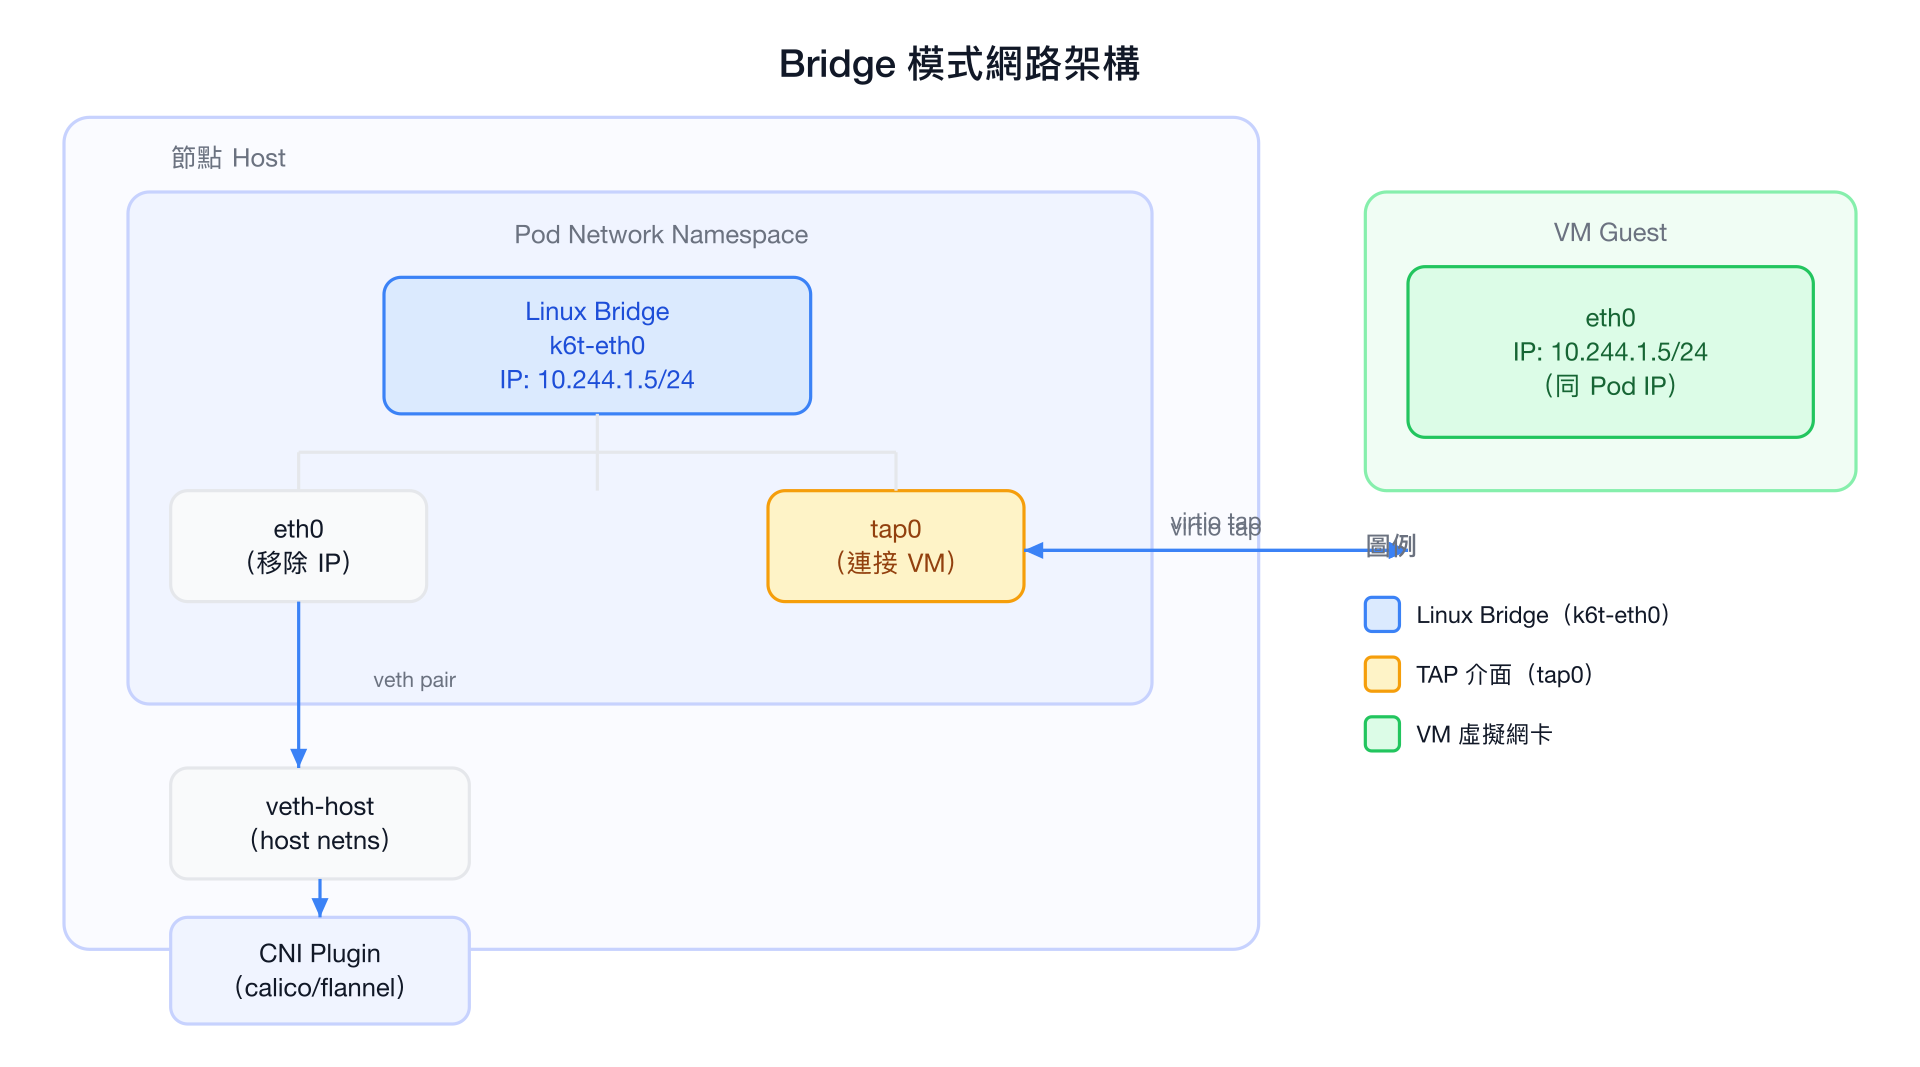
Bridge 模式在 Pod 的 network namespace 內建立一個 Linux bridge,讓 VM 直接共享 Pod 的 IP 地址,達到 L2 層透明橋接的效果。
Phase 1 具體操作(virt-handler 執行)
進入 Pod 的 network namespace 後,virt-handler 執行以下操作:
- 建立 Linux bridge
k6t-eth0 - 將 Pod IP 從
eth0移除,並將eth0連接到 bridge - 將 Pod IP 設定到 bridge
k6t-eth0上 - 設定 ARP proxy:讓 bridge 代替 VM 回應 ARP 請求
# Phase 1 內部等效操作(示意)
ip link add name k6t-eth0 type bridge
ip link set eth0 master k6t-eth0
ip addr del 10.244.1.5/24 dev eth0
ip addr add 10.244.1.5/24 dev k6t-eth0
ip link set k6t-eth0 up

# 設定 ARP proxy
echo 1 > /proc/sys/net/ipv4/conf/k6t-eth0/proxy_arp
Phase 2 具體操作(virt-launcher 執行)
virt-launcher 讀取 Phase 1 快取後,設定 libvirt XML:
<!-- libvirt domain XML(示意) -->
<interface type='bridge'>
  <source bridge='k6t-eth0'/>
  <model type='virtio'/>
  <driver name='vhost'/>
</interface>
ARP Proxy 的角色
Bridge 模式中,VM 與 Pod 共享同一個 IP。當外部節點透過 ARP 查詢這個 IP 時,Pod 的 bridge(k6t-eth0)會代替 VM 回應,確保流量正確路由到 Pod,再透過 tap 介面送達 VM。
系統核心參數要求
Bridge 模式需要節點設定以下核心參數,否則 iptables 規則不會套用到 bridge 流量:
sysctl -w net.bridge.bridge-nf-call-iptables=1
sysctl -w net.bridge.bridge-nf-call-ip6tables=1
這通常由節點初始化腳本設定。
適用場景
- VM 需要在 L2 網路直接可見(例如需要 MAC 地址識別)
- 需要接收 廣播/多播 流量
- 使用 VLAN 標記的場景(配合 Multus)
- 與現有傳統基礎設施整合,需要 VM 有真實的 L2 存在感
Bridge 模式限制
Bridge 模式限制
- Pod 底層網路必須支援 L2 通訊(不能是純 L3 路由網路,例如某些雲端環境)
- 要求
net.bridge.bridge-nf-call-iptables=1 - 不支援 Live Migration(IP 共享特性導致遷移複雜)
- Phase 1 需要特權操作,安全邊界較低
Bridge 模式完整 YAML 範例
# NetworkAttachmentDefinition(需要 Multus)
apiVersion: "k8s.cni.cncf.io/v1"
kind: NetworkAttachmentDefinition
metadata:
  name: bridge-network
  namespace: default
spec:
  config: |
    {
      "cniVersion": "0.3.1",
      "name": "bridge-network",
      "type": "bridge",
      "bridge": "br-vm",
      "isGateway": false,
      "ipam": {
        "type": "static"
      }
    }
---
# VirtualMachineInstance 使用 Bridge 模式
apiVersion: kubevirt.io/v1
kind: VirtualMachineInstance
metadata:
  name: vm-bridge-example
  namespace: default
spec:
  domain:
    cpu:
      cores: 2
    memory:
      guest: 2Gi
    devices:
      disks:
        - name: rootdisk
          disk:
            bus: virtio
      interfaces:
        # Pod 預設網路使用 bridge
        - name: default
          bridge: {}
          # 也可以指定 MAC 地址
          # macAddress: "02:00:00:00:00:01"
        # 附加的 bridge 網路(透過 Multus)
        - name: secondary
          bridge: {}
  networks:
    - name: default
      pod: {}
    - name: secondary
      multus:
        networkName: bridge-network
  volumes:
    - name: rootdisk
      containerDisk:
        image: quay.io/containerdisks/fedora:latest
Masquerade 模式
工作原理
Masquerade 模式使用 NAT(Network Address Translation)+ 內建 DHCP Server 的方式,讓 VM 擁有一個獨立的私有 IP,透過 nftables 規則進行出入站流量的轉換。

網路地址配置(預設)
| 角色 | IP 地址 | 持有者 |
|---|---|---|
| Pod IP | 10.244.1.5(由 CNI 分配) | Pod eth0 |
| VM Gateway | 10.0.2.1 | virt-launcher tap0 |
| VM IP | 10.0.2.2 | VM eth0(DHCP 分配) |
| DNS | 10.0.2.3 | 對應 cluster DNS |
| Gateway CIDR | 10.0.2.0/24 | 預設私有網段 |
DHCP Server 的角色
virt-launcher 內建一個輕量 DHCP server,監聽在 tap 介面上。當 VM 開機並發出 DHCP 請求時,DHCP server 自動回應:
- IP: 10.0.2.2/24
- Gateway: 10.0.2.1
- DNS: 10.0.2.3(通常轉發到 cluster DNS,如 CoreDNS 的 ClusterIP)
- 搜尋域: 繼承 Pod 的 DNS 設定
Phase 1 具體操作(virt-handler 執行)
# Phase 1 nftables 規則(示意)

# 出站:MASQUERADE(VM → 外部)
# 來自 10.0.2.2 的流量,透過 eth0 出去時改寫來源 IP 為 Pod IP
nft add rule ip nat POSTROUTING \
    ip saddr 10.0.2.2 \
    oif eth0 \
    masquerade

# 入站:DNAT(外部 → VM)
# 對應 ports 設定,將入站流量轉發到 VM
nft add rule ip nat PREROUTING \
    iif eth0 \
    tcp dport 80 \
    dnat to 10.0.2.2:80

# IPv6 支援(如果啟用雙棧)
nft add rule ip6 nat POSTROUTING \
    ip6 saddr fd10:0:2::2 \
    oif eth0 \
    masquerade
Phase 2 具體操作(virt-launcher 執行)
<!-- libvirt domain XML(示意) -->
<interface type='ethernet'>
  <target dev='tap0' managed='no'/>
  <model type='virtio'/>
  <driver name='vhost'/>
</interface>
virt-launcher 同時啟動內建 DHCP server,監聽在 tap0 介面。
nftables 規則詳解
IPv4/IPv6 雙棧支援
# 啟用雙棧 Masquerade
spec:
  domain:
    devices:
      interfaces:
        - name: default
          masquerade: {}
          ports:
            - name: http
              port: 80
              protocol: TCP
            - name: https
              port: 443
              protocol: TCP
  networks:
    - name: default
      pod: {}
IPv6 支援
Masquerade 支援 IPv4/IPv6 雙棧。若叢集開啟了雙棧,VM 會同時收到 IPv4(10.0.2.2)和 IPv6(fd10:0:2::2)地址。
暴露 VM Ports
由於 VM 的 IP(10.0.2.2)對外不可見,要讓叢集其他服務存取 VM,需要透過 Kubernetes Service 或 virtctl port-forward:
# 方法 1:建立 Kubernetes Service
apiVersion: v1
kind: Service
metadata:
  name: vm-http-service
spec:
  selector:
    # 對應 virt-launcher Pod 的 label
    vm.kubevirt.io/name: vm-masquerade-example
  ports:
    - name: http
      port: 80
      targetPort: 80
      protocol: TCP
type: ClusterIP# 方法 2:virtctl port-forward(開發/除錯用)
virtctl port-forward vm/vm-masquerade-example 8080:80
# 方法 3:kubectl port-forward(透過 virt-launcher Pod)
kubectl port-forward pod/virt-launcher-vm-masquerade-example-xxxxx 8080:80關於 ports 宣告
在 VMI spec 中宣告 ports 是為了讓 KubeVirt 建立對應的 nftables DNAT 規則,使流量能夠到達 VM。如果不宣告 ports,入站連線會被 nftables 丟棄。
Gateway CIDR 自訂設定
預設 Gateway CIDR 是 10.0.2.0/24,可以自訂以避免與 VM 內部網路衝突:
spec:
  domain:
    devices:
      interfaces:
        - name: default
          masquerade:
            # 自訂 IPv4 gateway CIDR
            cidr: "192.168.100.0/30"
          ports:
            - port: 22
              protocol: TCP
  networks:
    - name: default
pod: {}# IPv6 自訂 CIDR
spec:
domain:
devices:
interfaces:
- name: default
masquerade:
cidr: "fd10:0:2::/120"| 設定項 | 說明 | 預設值 |
|---|---|---|
cidr (IPv4) | VM 使用的私有網段 | 10.0.2.0/24 |
cidr (IPv6) | VM 使用的私有 IPv6 網段 | fd10:0:2::/120 |
Masquerade 模式限制
Masquerade 模式注意事項
- VM IP(10.0.2.2)對叢集其他元件不可見,需要透過 Service 才能被存取
- 不適合需要 VM 在 L2 直接可達的場景
- 每個需要對外暴露的 port 都需要明確宣告
Masquerade 推薦原因
- ✅ 安全性高:VM IP 與 Pod IP 隔離,外部無法直接存取 VM IP
- ✅ 不依賴 L2:適用於各種 CNI(Calico、Cilium、Flannel 等)
- ✅ 支援 Live Migration:不依賴特定 IP 綁定
- ✅ 支援雙棧:IPv4 + IPv6 同時支援
Masquerade 模式完整 YAML 範例
apiVersion: kubevirt.io/v1
kind: VirtualMachine
metadata:
  name: vm-masquerade-example
  namespace: default
spec:
  running: true
  template:
    metadata:
      labels:
        app: my-vm
    spec:
      domain:
        cpu:
          cores: 2
          sockets: 1
          threads: 1
        memory:
          guest: 4Gi
        devices:
          disks:
            - name: rootdisk
              disk:
                bus: virtio
            - name: cloudinit
              disk:
                bus: virtio
          interfaces:
            - name: default
              masquerade: {}
              # 宣告需要暴露的 ports(建立 nftables DNAT 規則)
              ports:
                - name: ssh
                  port: 22
                  protocol: TCP
                - name: http
                  port: 80
                  protocol: TCP
                - name: https
                  port: 443
                  protocol: TCP
          # 自訂 Gateway CIDR(可選)
          # interfaces:
          #   - name: default
          #     masquerade:
          #       cidr: "192.168.200.0/30"
      networks:
        - name: default
          pod: {}
      volumes:
        - name: rootdisk
          containerDisk:
            image: quay.io/containerdisks/fedora:latest
        - name: cloudinit
          cloudInitNoCloud:
            userData: |
              #cloud-config
              user: fedora
              password: fedora
              chpasswd: { expire: False }
              ssh_authorized_keys:
                - ssh-rsa AAAA...your-public-key...
---
# 對應的 Kubernetes Service
apiVersion: v1
kind: Service
metadata:
  name: vm-masquerade-ssh
  namespace: default
spec:
  selector:
    vm.kubevirt.io/name: vm-masquerade-example
  ports:
    - name: ssh
      port: 22
      targetPort: 22
      protocol: TCP
  type: ClusterIP
Bridge vs Masquerade 完整比較
| 比較項目 | Bridge | Masquerade |
|---|---|---|
| 網路層 | L2(資料鏈路層) | L3+(網路層,NAT) |
| VM IP 與 Pod IP | 相同(共享) | 不同(VM 使用私有 IP) |
| 外部可見性 | VM IP 直接可達 | 需透過 Service/port-forward |
| 效能 | 較高(無 NAT 開銷) | 略低(nftables 轉換開銷小) |
| Live Migration | ❌ 不支援 | ✅ 支援 |
| Phase 1 特權操作 | ✅ 需要(建立 bridge) | ✅ 需要(設定 nftables) |
| CNI 相容性 | 需要 L2 支援 | 支援所有 CNI |
| ARP Proxy | 需要 | 不需要 |
| DHCP Server | 不需要(VM 取得 Pod IP) | 需要(virt-launcher 內建) |
| 適合場景 | L2 直連、傳統基礎設施 | 現代雲原生、Live Migration |
| 推薦度 | 特殊需求 | ⭐ 預設推薦 |
Phase 1 vs Phase 2 在兩種模式下的差異
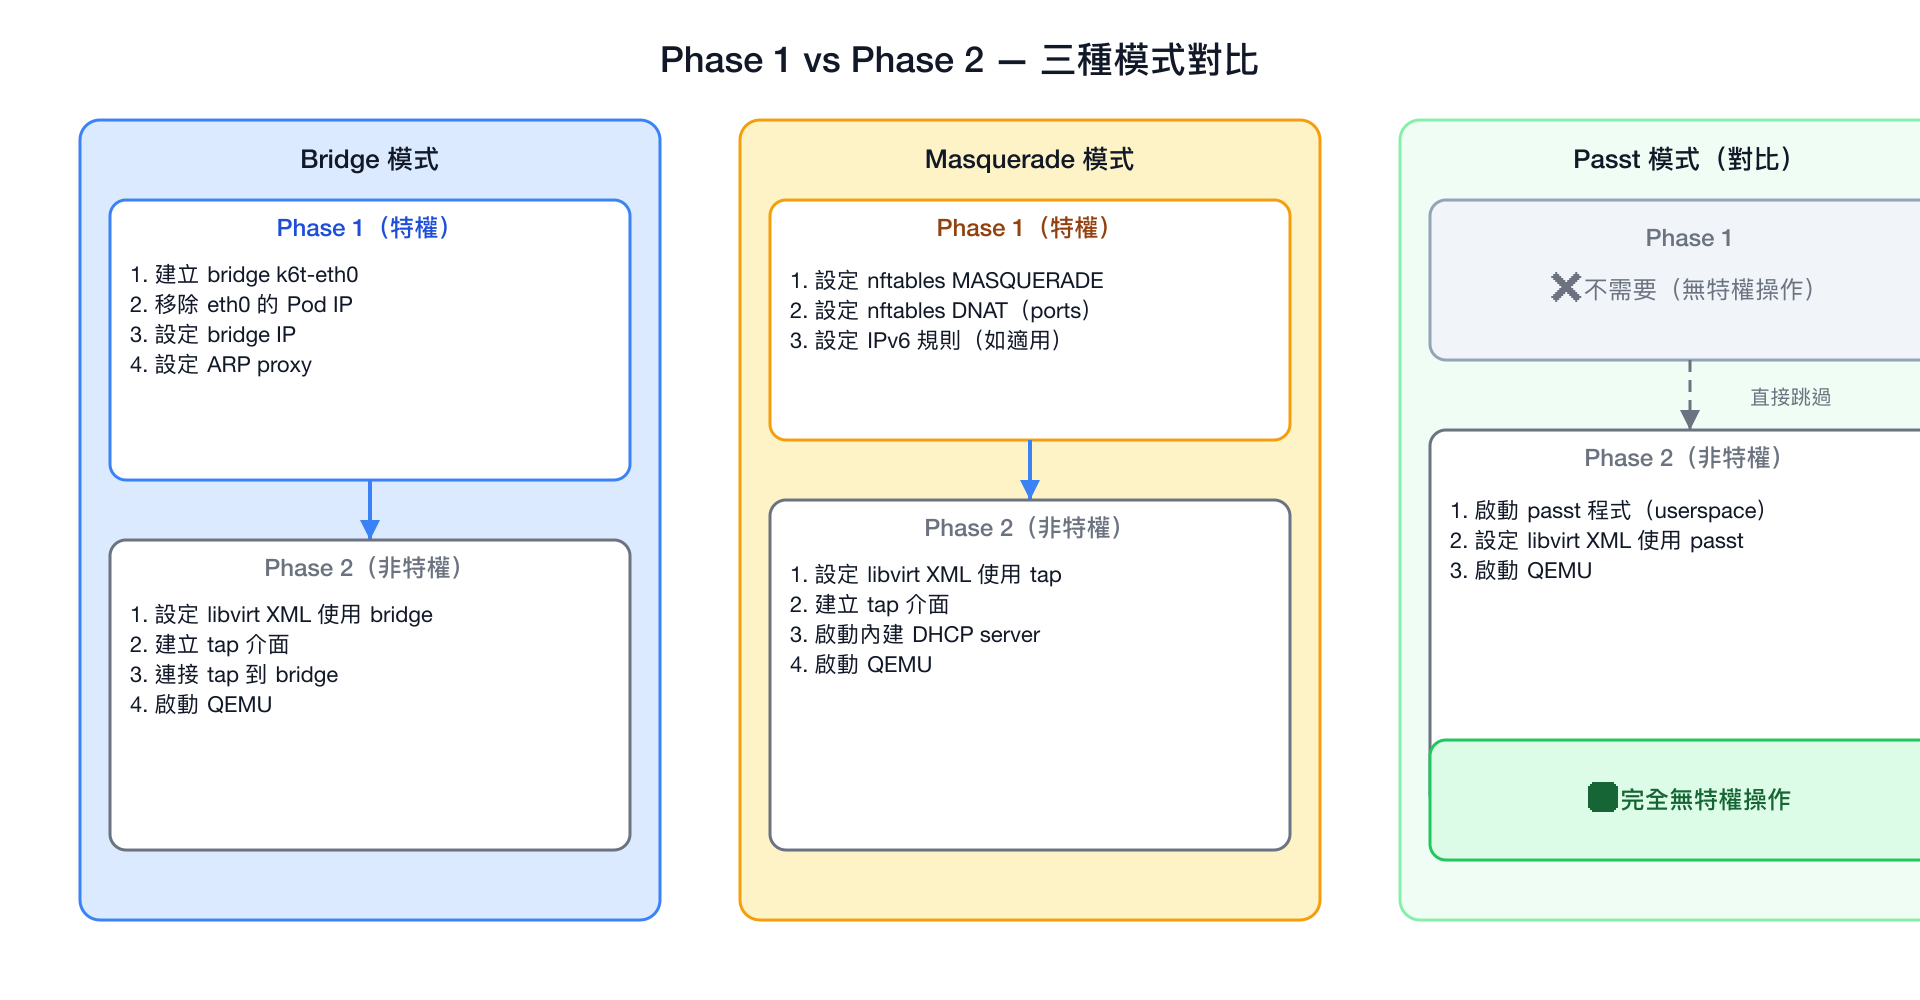
Passt 的優勢
Passt(Plug A Simple Socket Transport)是新一代的網路綁定模式,完全不需要 Phase 1 特權操作。它在使用者態實作完整的 TCP/IP 協定棧,是未來的推薦方向。詳見 SR-IOV 與進階網路 中的 Passt 章節。
DHCP Server 詳細說明
virt-launcher 內建的 DHCP server 專門為 Masquerade 模式服務:
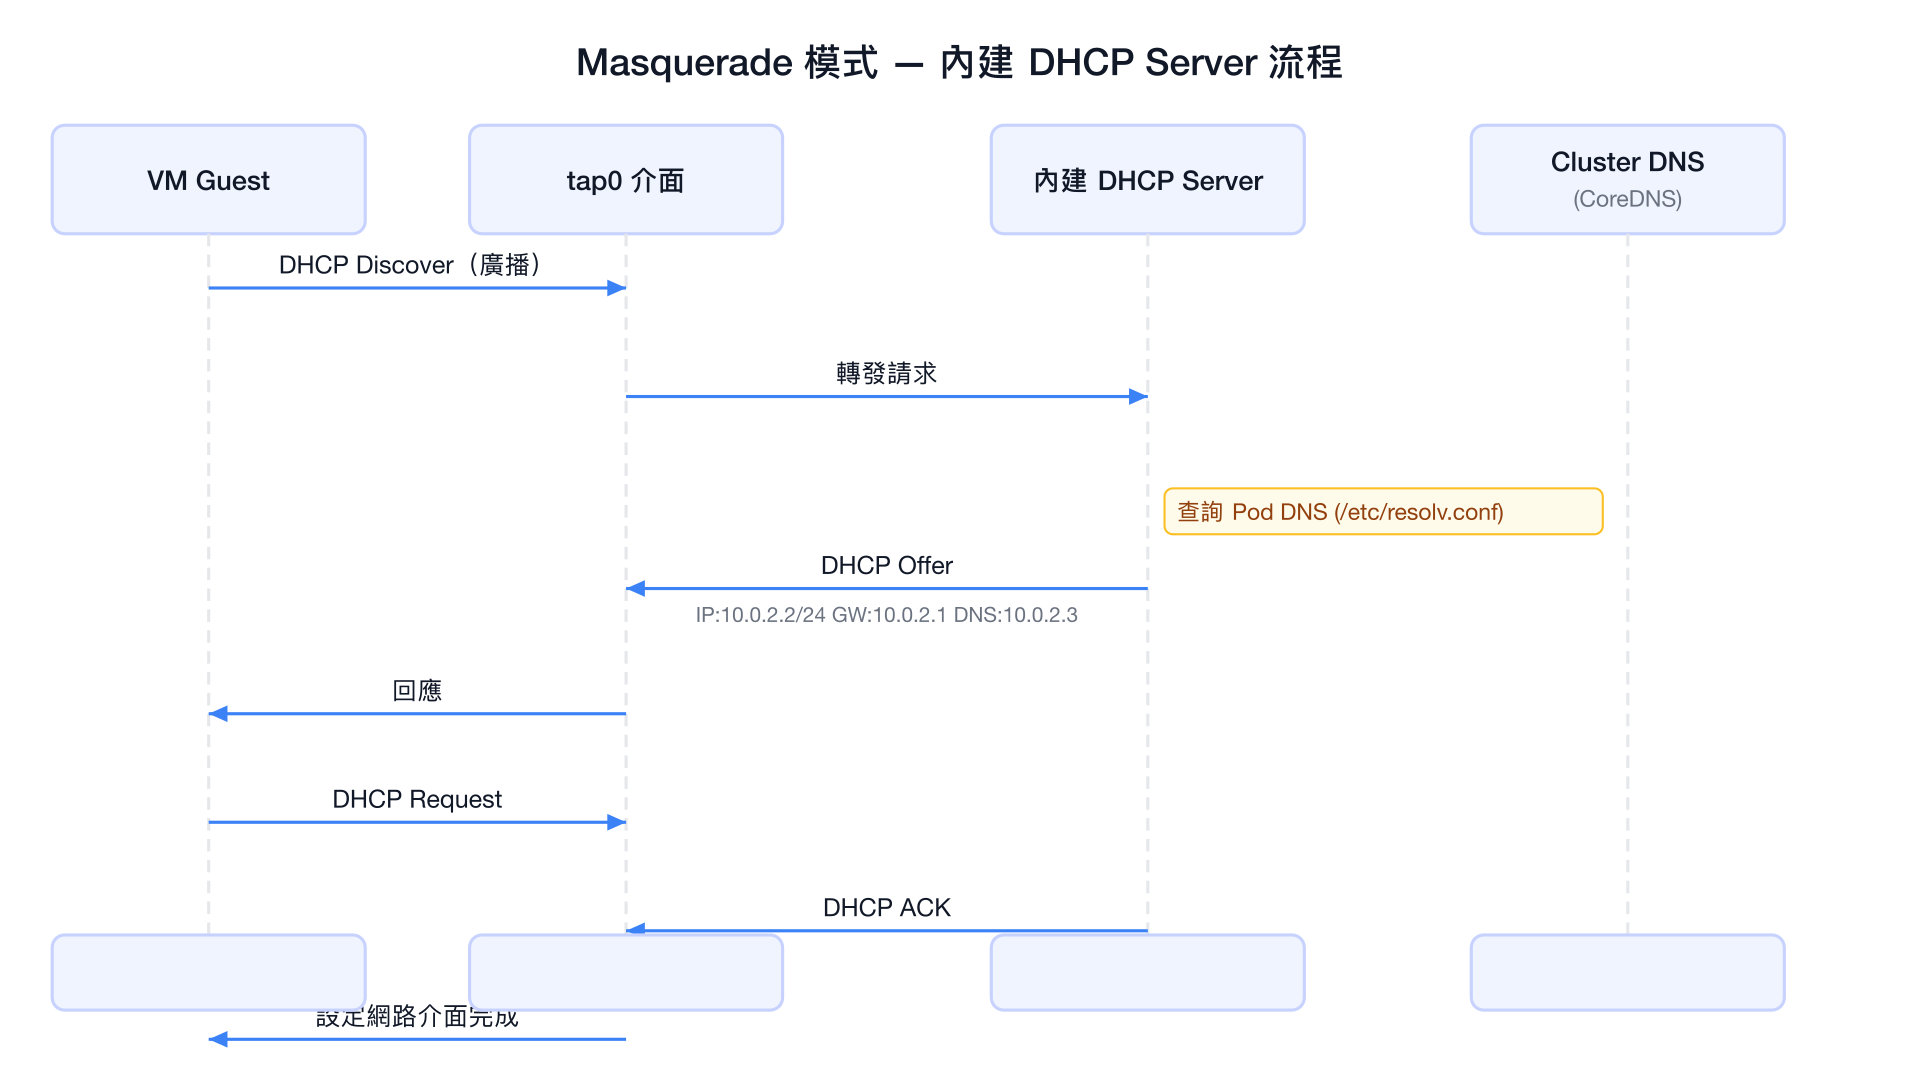
| DHCP 回應欄位 | 值 | 說明 |
|---|---|---|
| IP Address | 10.0.2.2 | VM 的固定 IP |
| Subnet Mask | 255.255.255.0 | /24 網路遮罩 |
| Default Gateway | 10.0.2.1 | virt-launcher 持有的 tap IP |
| DNS Server | 10.0.2.3 | 對應 cluster DNS ClusterIP |
| Domain Search | pod 繼承 | 如 default.svc.cluster.local |
| Lease Time | 很長(近乎永久) | 避免 DHCP 續約問題 |
常見問題排查
Bridge 模式問題
# 檢查 bridge 是否建立
kubectl exec -it virt-launcher-<vm-name>-<hash> -- \
    ip link show type bridge

# 檢查 ARP proxy 設定
kubectl exec -it virt-launcher-<vm-name>-<hash> -- \
    cat /proc/sys/net/ipv4/conf/k6t-eth0/proxy_arp

# 查看 bridge 成員
kubectl exec -it virt-launcher-<vm-name>-<hash> -- \
    bridge link show
Masquerade 模式問題
# 檢查 nftables 規則
kubectl exec -it virt-launcher-<vm-name>-<hash> -- \
    nft list ruleset

# 驗證 DHCP server 是否在執行
kubectl exec -it virt-launcher-<vm-name>-<hash> -- \
    ps aux | grep dhcp

# 查看 VM 網路設定(透過 virsh)
virtctl console vm/<vm-name>
# 在 VM 內:
ip addr show
ip route show
cat /etc/resolv.conf
取得 virt-launcher Pod 名稱
# 列出對應 VM 的 virt-launcher Pod
kubectl get pods -l vm.kubevirt.io/name=<vm-name>

# 或使用 virtctl
virtctl ssh vm/<vm-name>